Using the LocalPosSystemApi Helper with an existing 1.2 CashBox
After reading this guide, you'll be able to configure the LocalPosSystemApi Helper for use with an existing Middleware 1.2 CashBox by setting up a new Middleware 1.3 CashBox alongside it.
For markets other than AT and FR, refer to the guide on setting up the Local PosSystem API Helper with the Launcher 2.0.
Introduction
This guide explains how to use the LocalPosSystemApi Helper with an existing Middleware 1.2 CashBox.
The LocalPosSystemApi Helper needs to run inside a Middleware 1.3 CashBox.
For this reason, you need to set up a second CashBox that contains only the LocalPosSystemApi Helper which is connecting to the queue running in the existing 1.2 CashBox.
Packages starting with fiskaltrust.service and fiskaltrust.signing are part of the Middleware 1.2 stack, while packages starting with fiskaltrust.Middleware are part of the Middleware 1.3 stack.
The Middleware 1.2 supports only the AT and FR markets. For new CashBoxes in the AT market, the Middleware 1.3 is also supported and should be preferred.
The process consists of the following main steps:
- Prepare the 1.2 CashBox with a REST Helper (if it isn't already configured).
- Create and configure a new LocalPosSystemApi Helper.
- Create a new 1.3 CashBox and assign the LocalPosSystemApi Helper.
Navigate to the existing 1.2 CashBox
To locate your existing Middleware 1.2 CashBox, navigate to Configuration / CashBox in the fiskaltrust Portal.
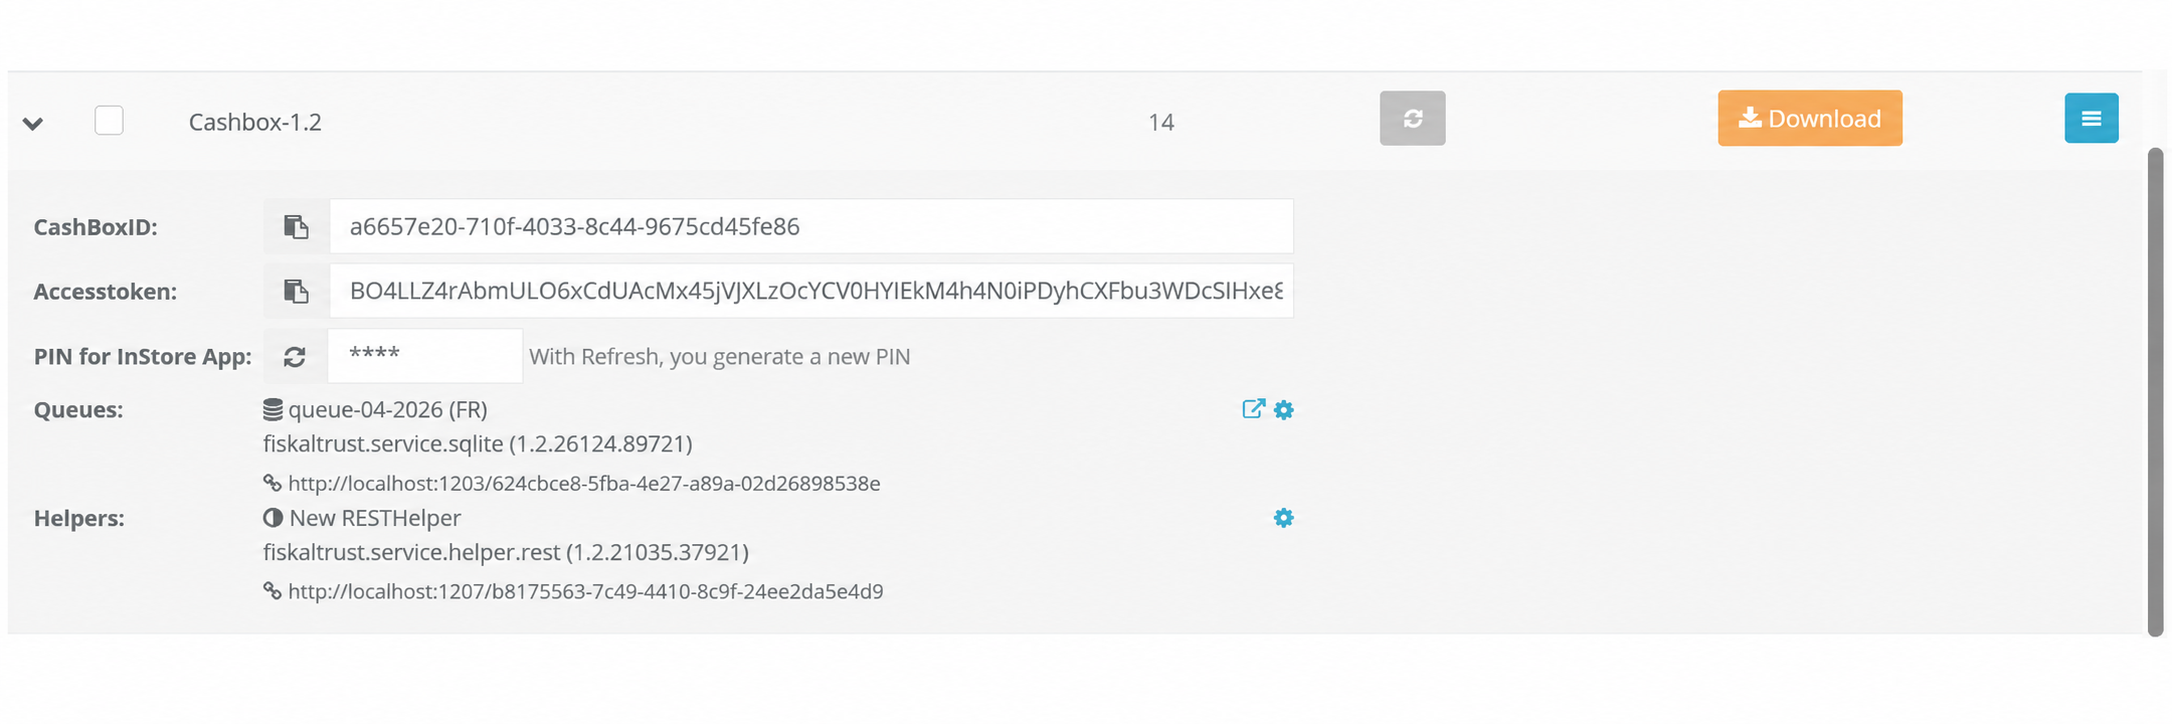
Figure 1. Locating the existing Middleware 1.2 CashBox in the fiskaltrust Portal.
| Steps | Description |
|---|---|
 | Navigate to Configuration / CashBox. |
 | Use the search field to filter CashBoxes by name or ID to locate the existing one. |
 | Identify the CashBox running Launcher 1.2 by checking the version displayed in the list. |
 | Click the expand arrow to reveal the CashBox configuration inline. |
 | Verify if a fiskaltrust.service.helper.rest is present. If it is present, you can skip the next step. |
Table 1. Steps to locate the existing 1.2 CashBox and check for a REST Helper.
You can verify that the packages are running version 1.2, for example. The Queue will show a package such as fiskaltrust.service.sqlite in version 1.2.
Add a REST Helper to the 1.2 CashBox
You can skip this step if a REST Helper is already configured in the 1.2 CashBox.
To add the local REST Helper, navigate to Configuration / Helper in the fiskaltrust Portal and follow the steps below. The following images and steps are provided as examples.
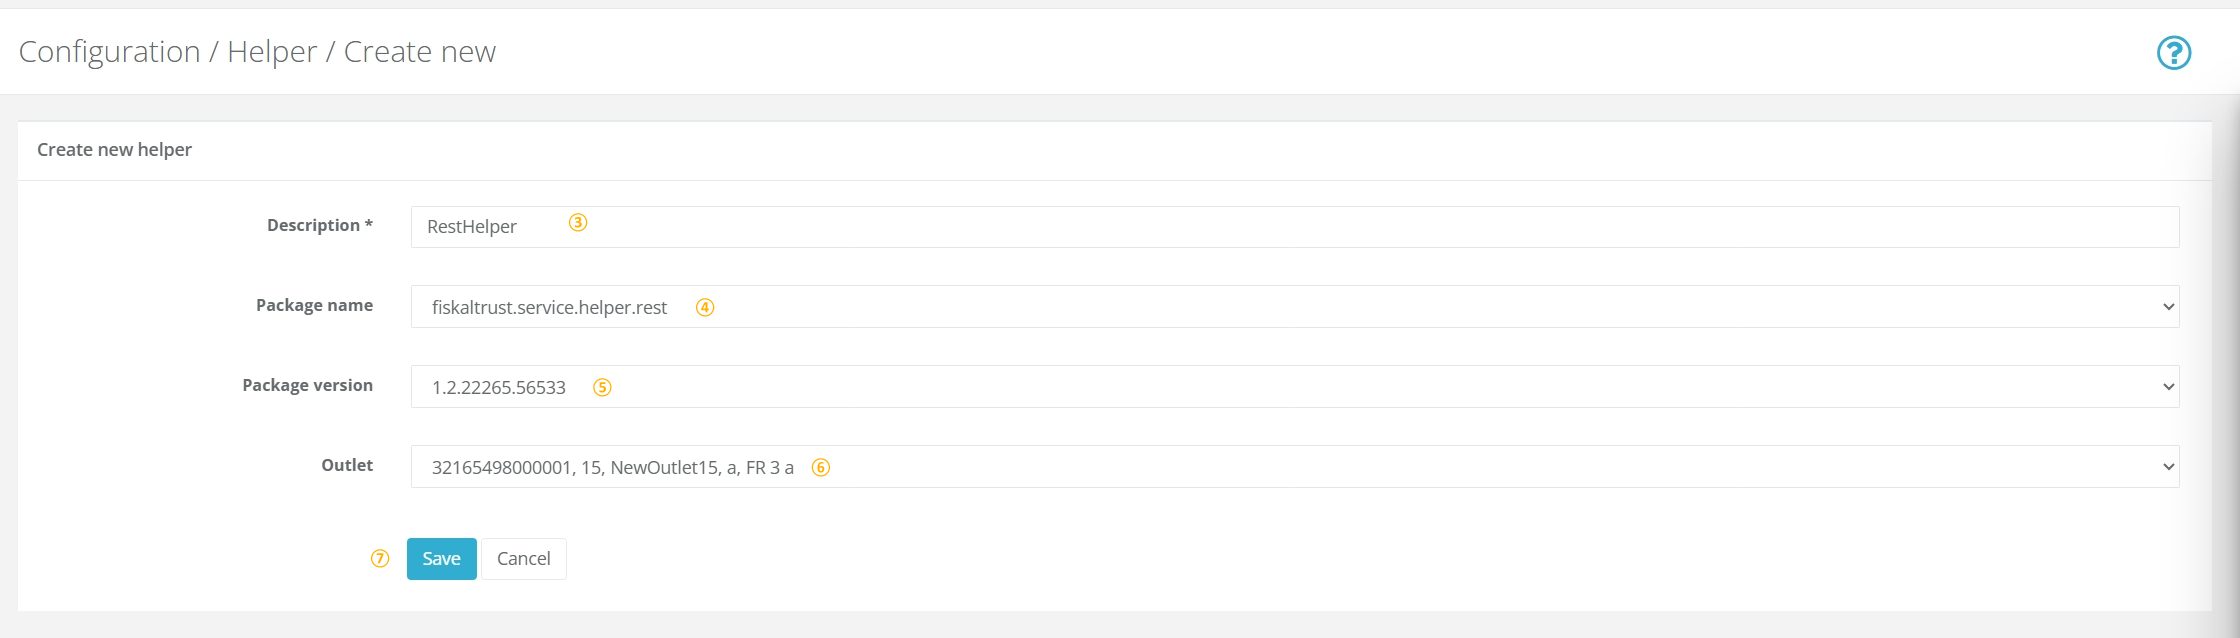
Figure 2. Creating a new REST Helper in the fiskaltrust Portal.
| Steps | Description |
|---|---|
| Navigate to Configuration/ Helper to open the Helper configuration. |
| Click +Add to create a new Helper. |
| Add or edit a name for your Helper at Description. |
| Select fiskaltrust.service.helper.rest from the Package name drop-down list. Note that this selection cannot be changed later. |
| Select the latest Package version from the drop-down list. |
 | Select one of the available outlets from the drop-down list. |
 | Click Save to save your changes. |
Table 2. Steps to create a new REST Helper.
After the Helper has been saved, a success notification confirms that it has been created. The configuration window for the new Helper then opens automatically, allowing you to proceed with the configuration.
Configure the REST Helper
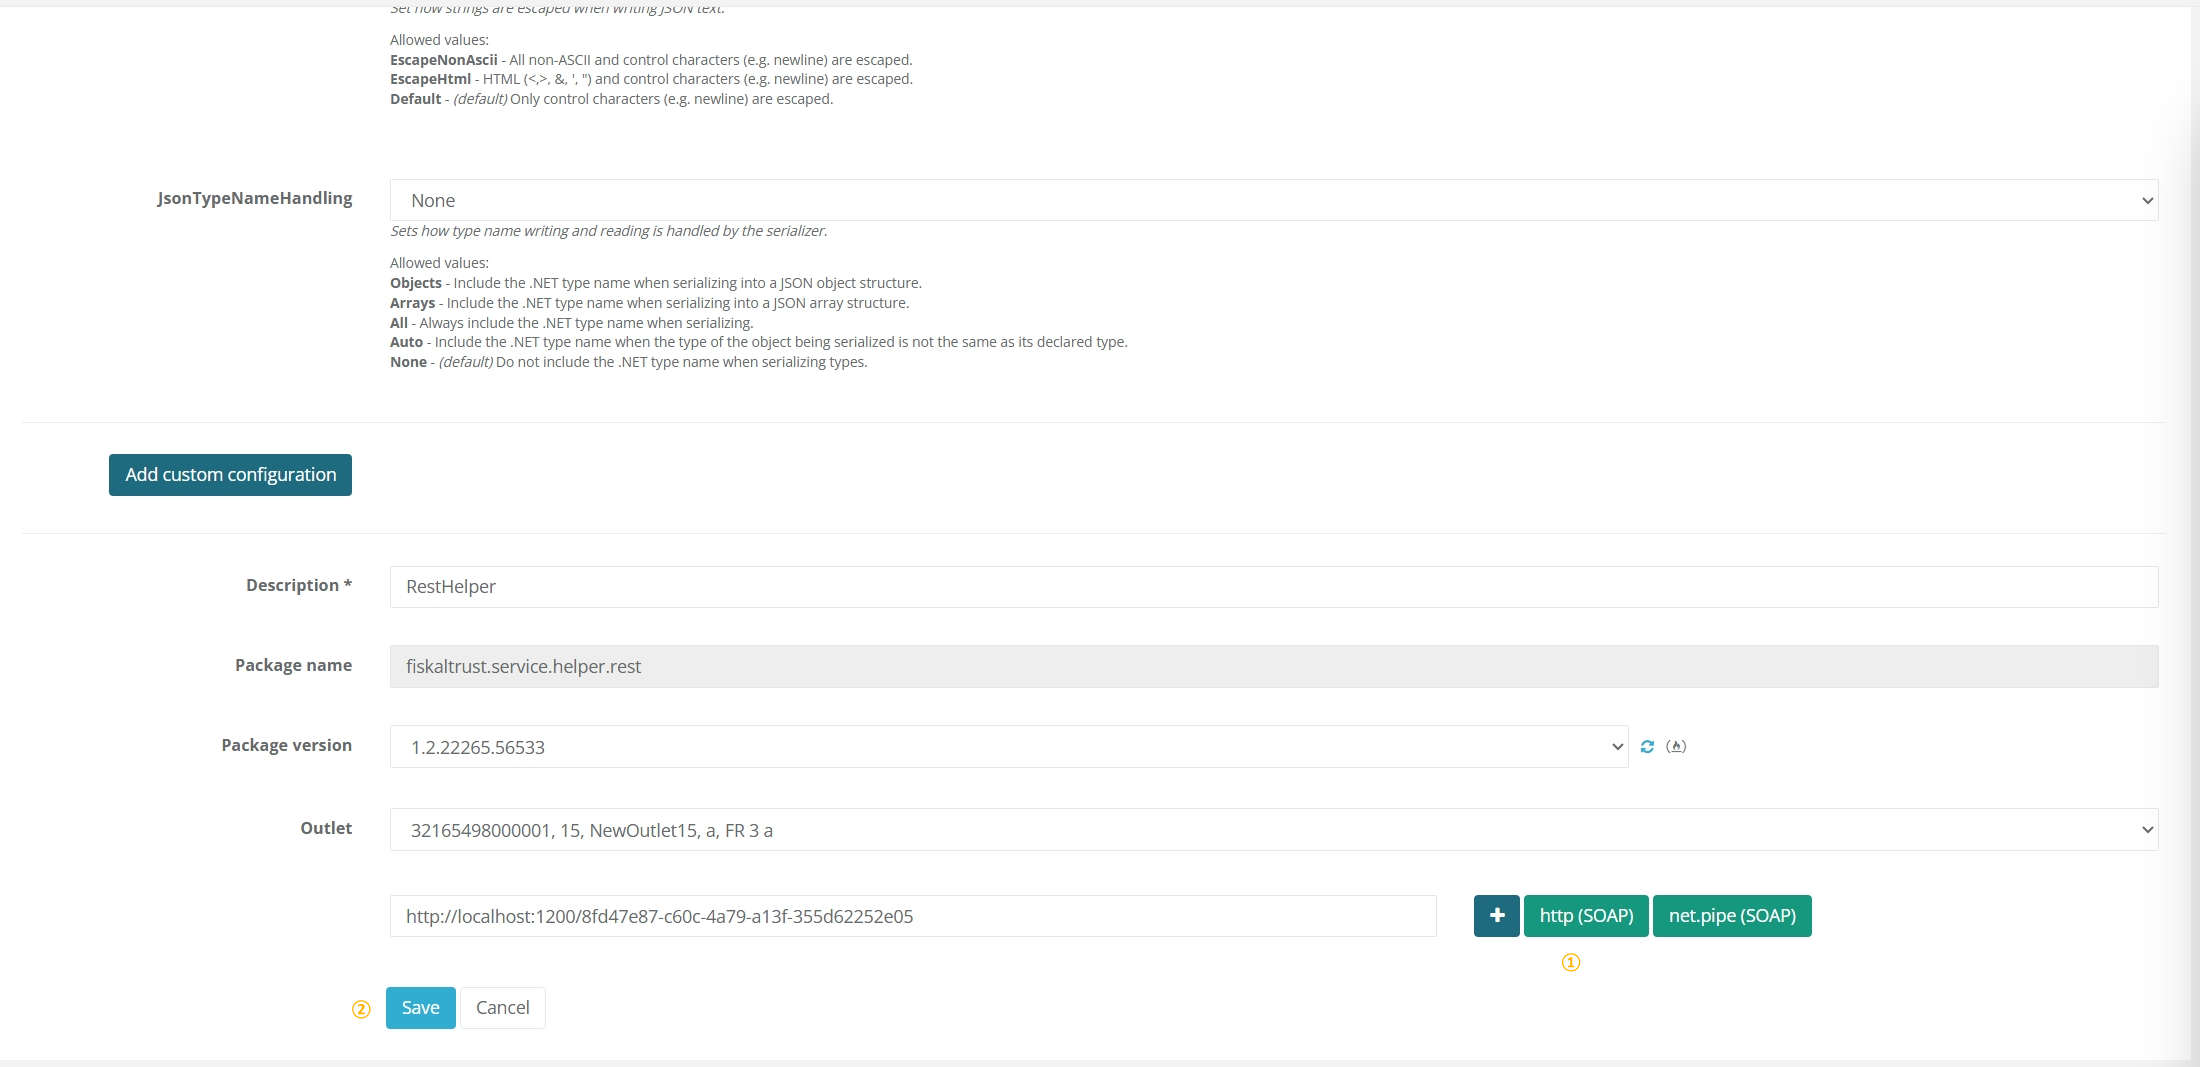
Figure 3. Configuring the REST Helper and generating its URL.
| Steps | Description |
|---|---|
| Click http (SOAP) to generate a URL that can be used to access the Helper. You can also rename the URL if desired. |
| Click Save to save your changes and return to Configuration / Helper. |
Table 3. Steps to configure the REST Helper.
Use the REST Helper in the 1.2 CashBox
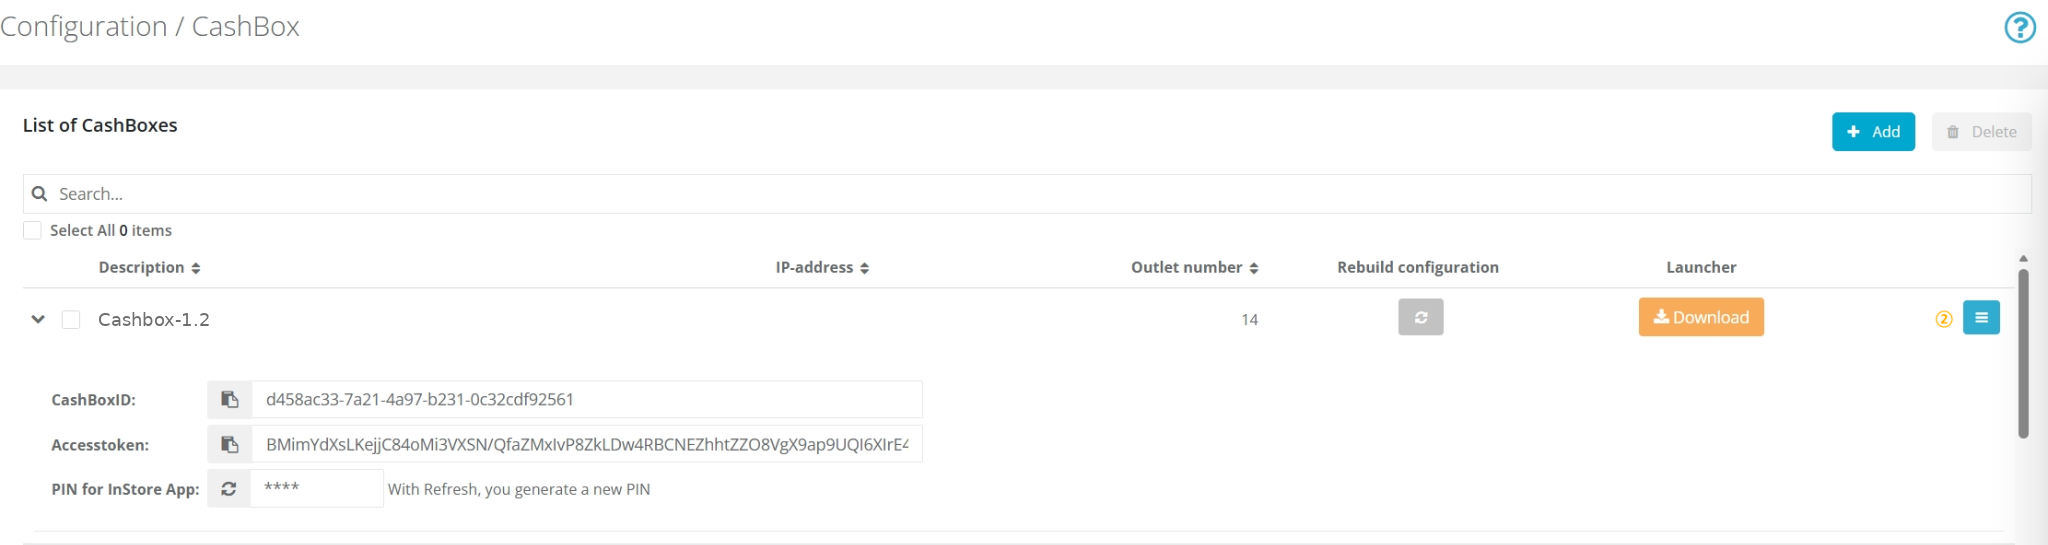
Figure 4. Opening the 1.2 CashBox configuration to assign the REST Helper.
| Steps | Description |
|---|---|
| Navigate to Configuration / CashBox and locate the 1.2 CashBox. |
| Click Edit to open the CashBox configuration. |
Table 4. Steps to open the 1.2 CashBox configuration.
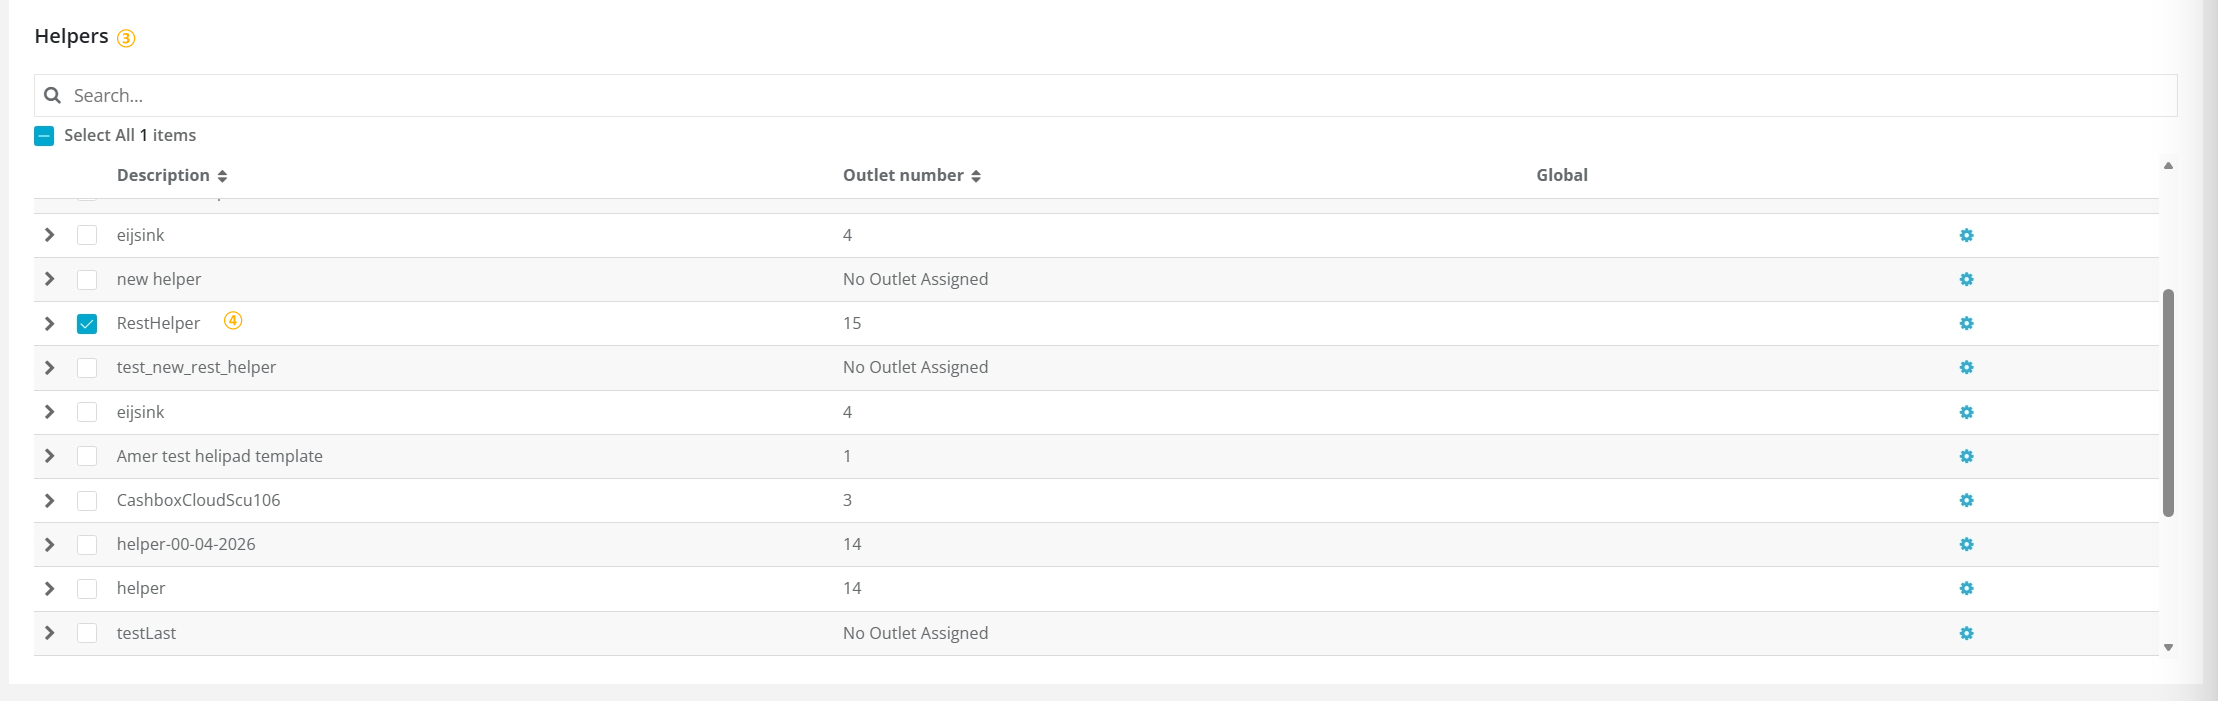
Figure 5. Selecting the newly created REST Helper in the CashBox configuration.
| Steps | Description |
|---|---|
| Scroll down to the Helpers section and locate the newly created REST Helper. |
| Activate the Helper by selecting its checkbox. |
Table 5. Steps to activate the REST Helper in the 1.2 CashBox.

Figure 6. Saving the CashBox configuration with the REST Helper enabled.
| Steps | Description |
|---|---|
| Scroll back to the top of the page. |
| Click Save to save your changes. |
Table 6. Steps to save the CashBox configuration.
Add a LocalPosSystemApi Helper
To add the LocalPosSystemApi Helper, navigate to Configuration / Helper in the fiskaltrust Portal and follow the steps below.
The following images and steps are provided as examples. At this point, the Helper is created only as a standalone resource. It will be assigned to the new 1.3 CashBox later.
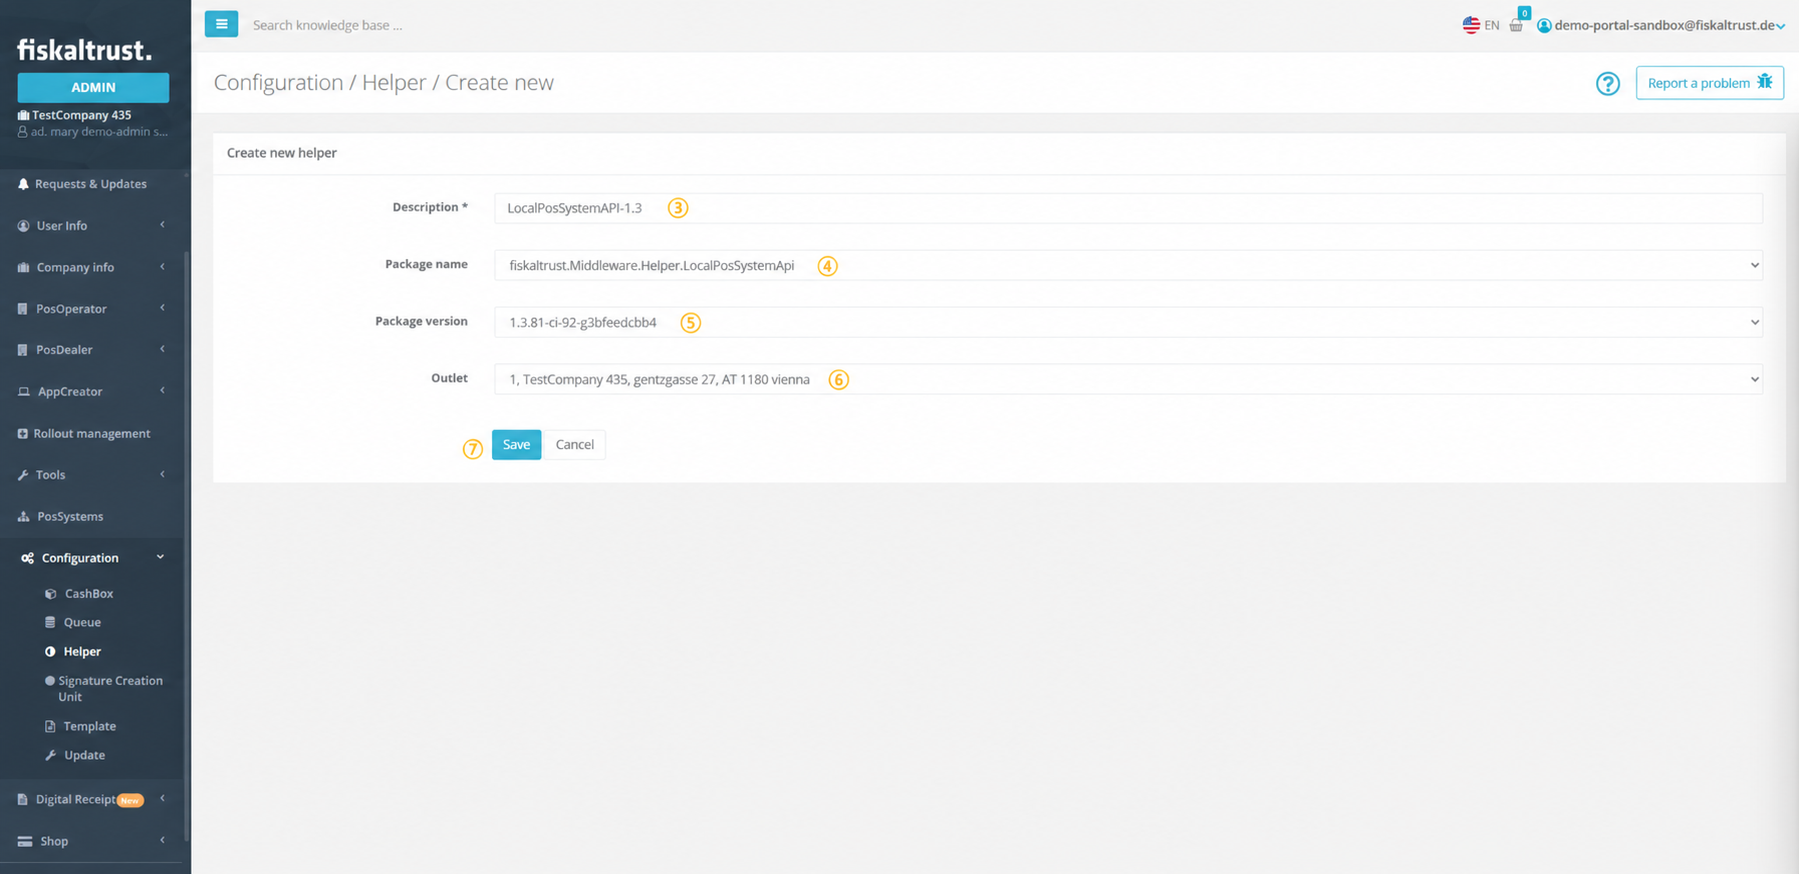
Figure 7. Creating a new LocalPosSystemApi Helper in the fiskaltrust Portal.
| Steps | Description |
|---|---|
| Navigate to Configuration/ Helper to open the Helper configuration. |
| Click +Add to create a new Helper. |
| Add or edit a name for your Helper at Description. |
| Select fiskaltrust.Middleware.Helper.LocalPosSystemApi from the Package name drop-down list. Note that this selection cannot be changed later. |
| Select the latest Package version from the drop-down list. |
| Select one of the available outlets from the drop-down list. |
| Click Save to save your changes. |
Table 7. Steps to create the LocalPosSystemApi Helper.
After the Helper has been saved, a success notification confirms that it has been created. The configuration window for the new Helper then opens automatically, allowing you to proceed with the configuration.
Configure the LocalPosSystemApi Helper
These settings configure the Helper itself, before it is assigned to the new 1.3 CashBox, so that it points to the queue of the existing 1.2 CashBox.
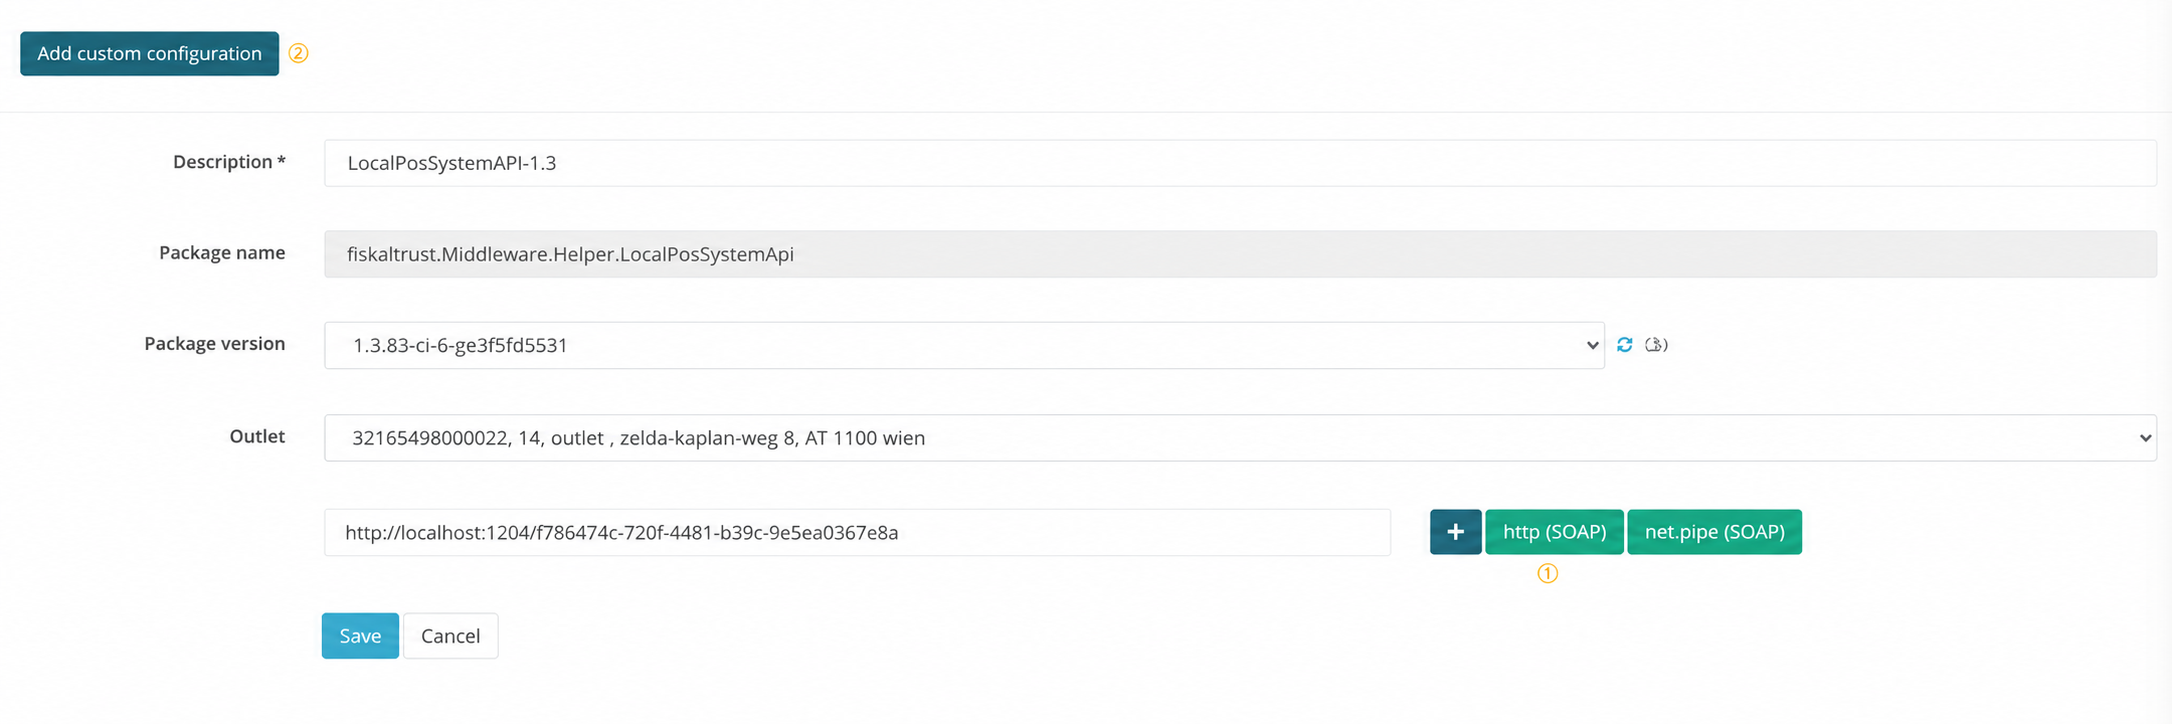
Figure 8. Adding custom configuration to the LocalPosSystemApi Helper.
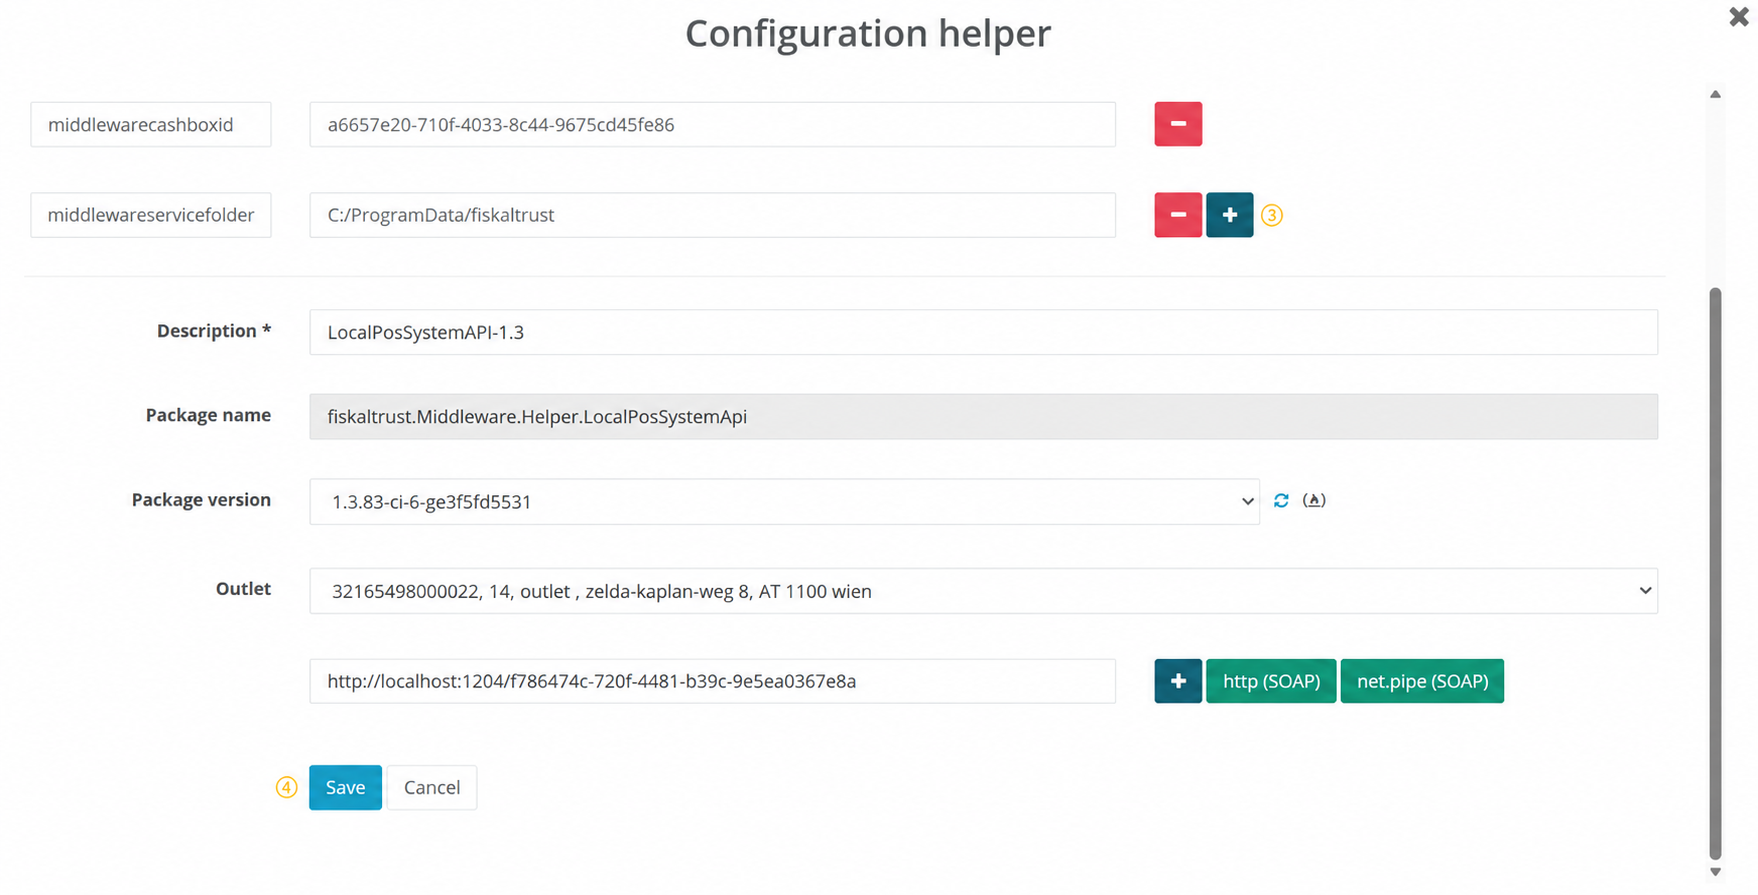
Figure 9. Custom configuration fields connecting the Helper to the 1.2 CashBox queue.
| Steps | Description |
|---|---|
| Click http to generate a URL that the POS system can use to access the Helper. You can also rename the URL if desired. |
| In the configuration window, click Add custom configuration to reveal the Key and Value input fields. |
| Enter the parameters listed below, one at a time. Click the + button next to each row to add the next entry. |
| Click Save to your changes and return to Configuration/ Helper. |
Table 8. Steps to configure the LocalPosSystemApi Helper.
| Key | Value |
|---|---|
middlewareaccesstoken | The AccessToken of the existing 1.2 CashBox. |
middlewarecashboxid | The CashBox ID of the existing 1.2 CashBox. |
middlewareservicefolder | C:/ProgramData/fiskaltrust (Optional. Required only if the service folder of the 1.2 CashBox has been changed from the default location. Set this value to the custom path so the Helper can locate the Middleware data.) |
Table 9. Custom configuration parameters that point the Helper to the 1.2 CashBox.
The LocalPosSystemApi Helper is now connected to the 1.2 CashBox.
Create a new 1.3 CashBox for the LocalPosSystemApi Helper
To create a new CashBox, navigate to Configuration / CashBox and follow the steps below.
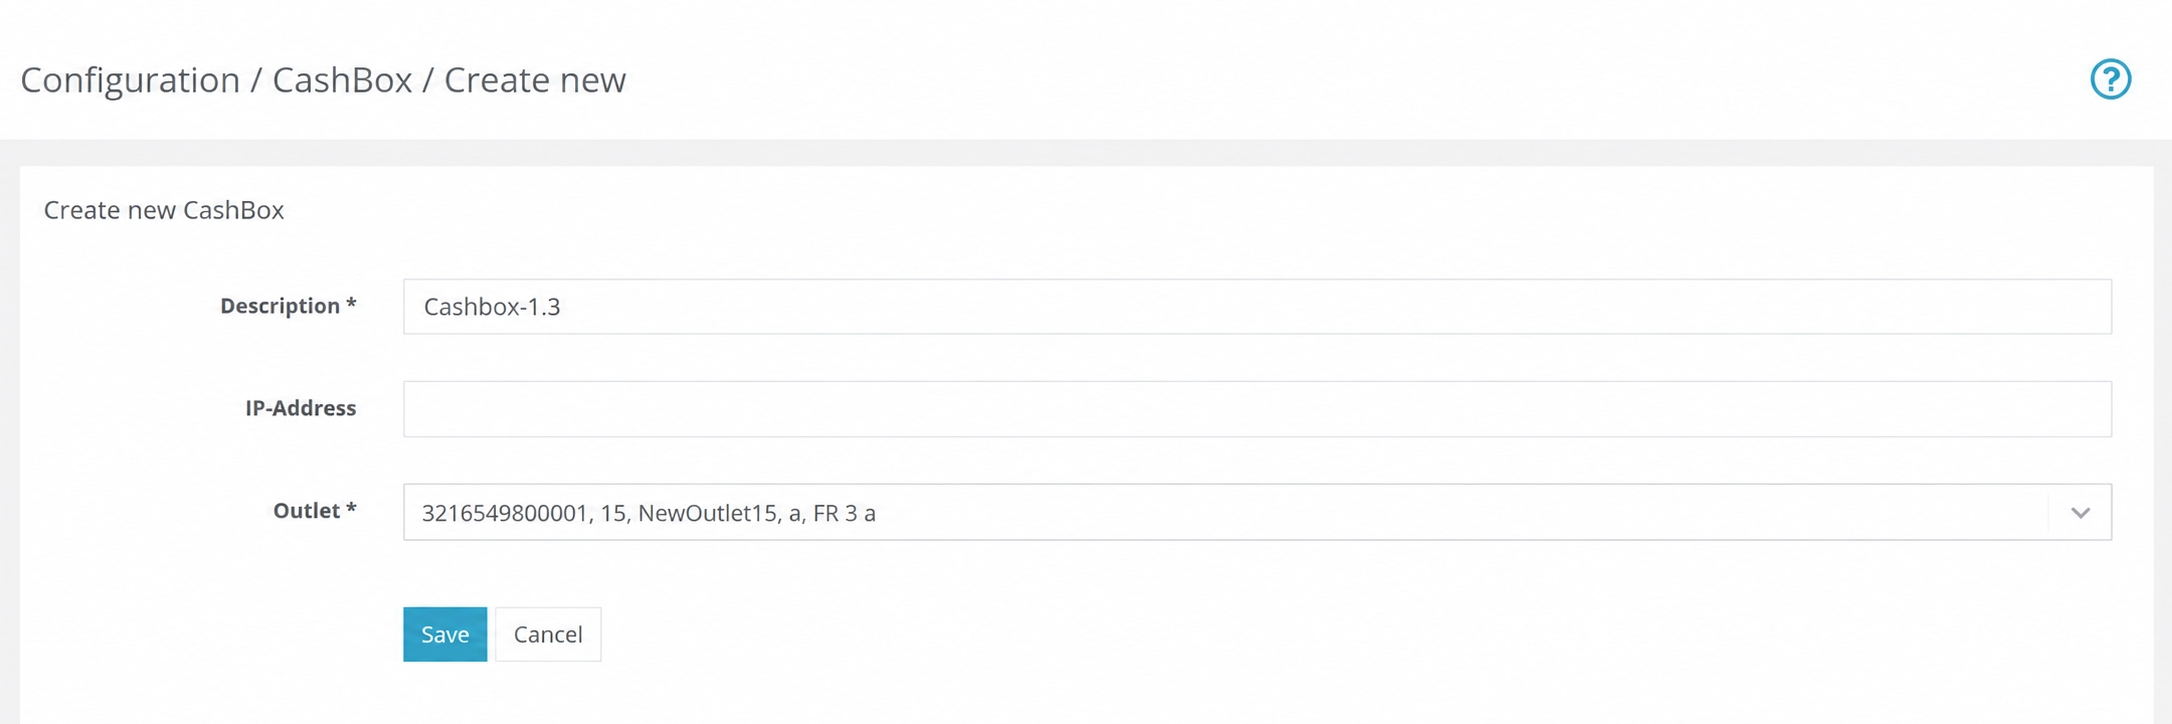
Figure 10. Creating a new 1.3 CashBox in the fiskaltrust Portal.
| Steps | Description |
|---|---|
| Navigate to Configuration / CashBox. |
| Click Add to create a new CashBox. |
| Enter a description for the new CashBox. |
| Select the appropriate outlet. |
| Click Save to save the new CashBox. |
Table 10. Steps to create the new 1.3 CashBox.
After saving, click Edit by list to configure the components of the new CashBox. Note that for this setup, only the LocalPosSystemApi Helper is added to this CashBox. No Queue or SCU is required.
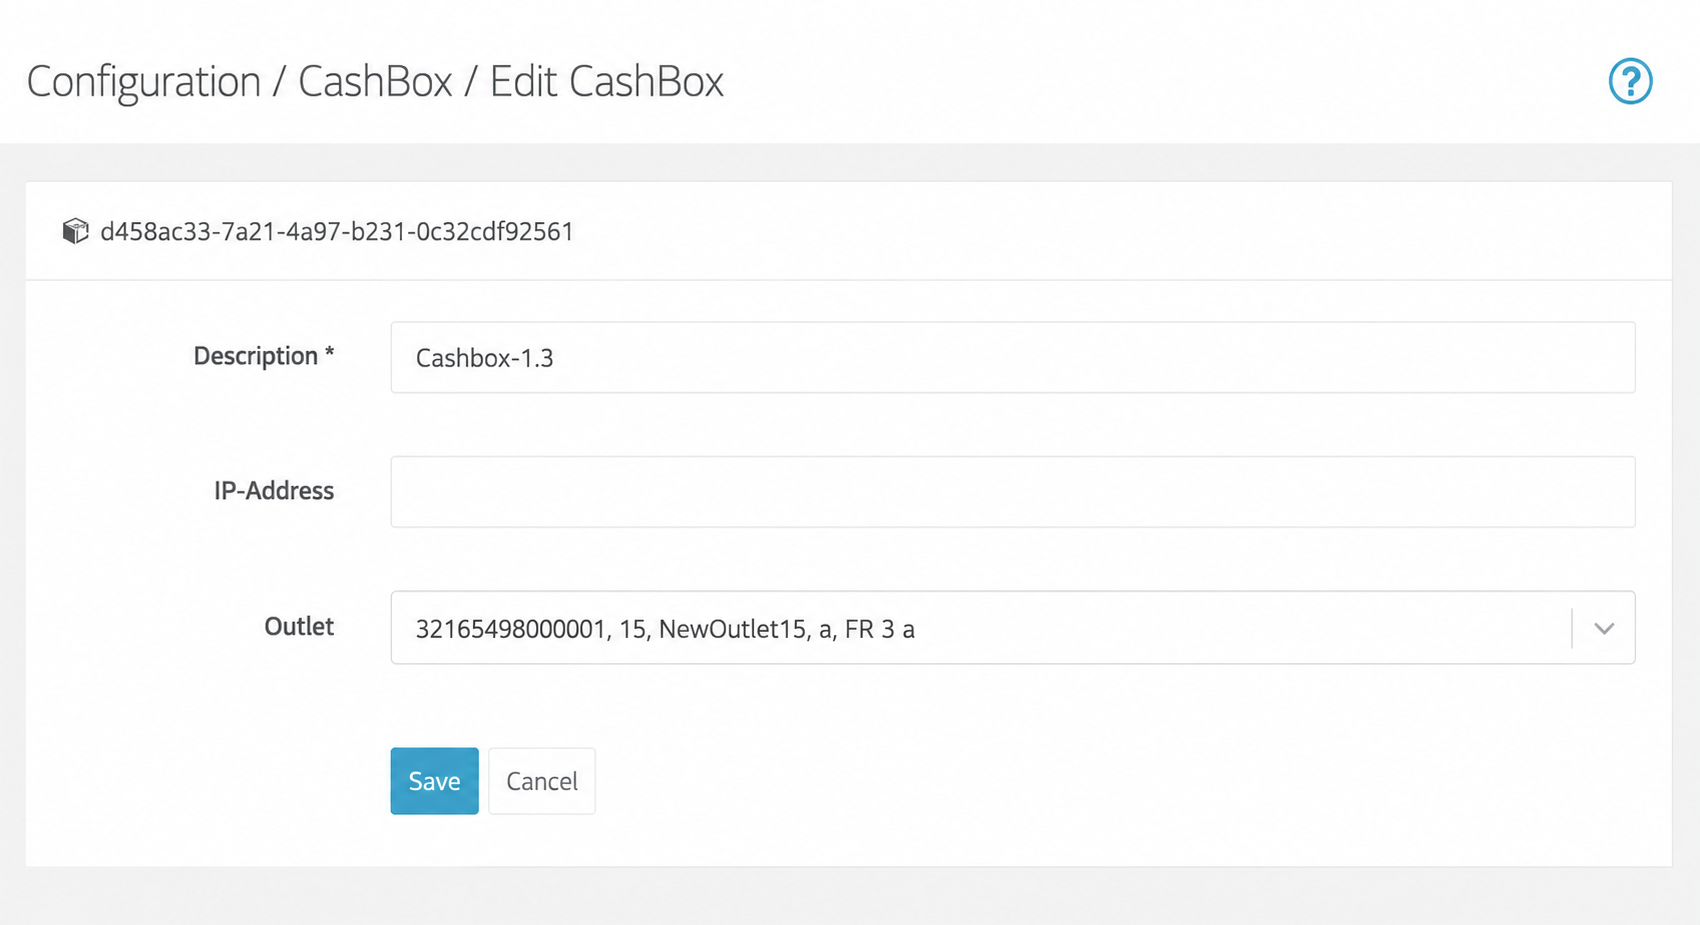
Figure 11. Assigning the LocalPosSystemApi Helper to the new 1.3 CashBox.
| Steps | Description |
|---|---|
| Scroll down to the Helpers section and locate the fiskaltrust.Middleware.Helper.LocalPosSystemApi Helper created above. |
| Activate the Helper by selecting its checkbox. |
| Click Save to save the CashBox configuration. |
Table 11. Steps to assign the Helper to the 1.3 CashBox.
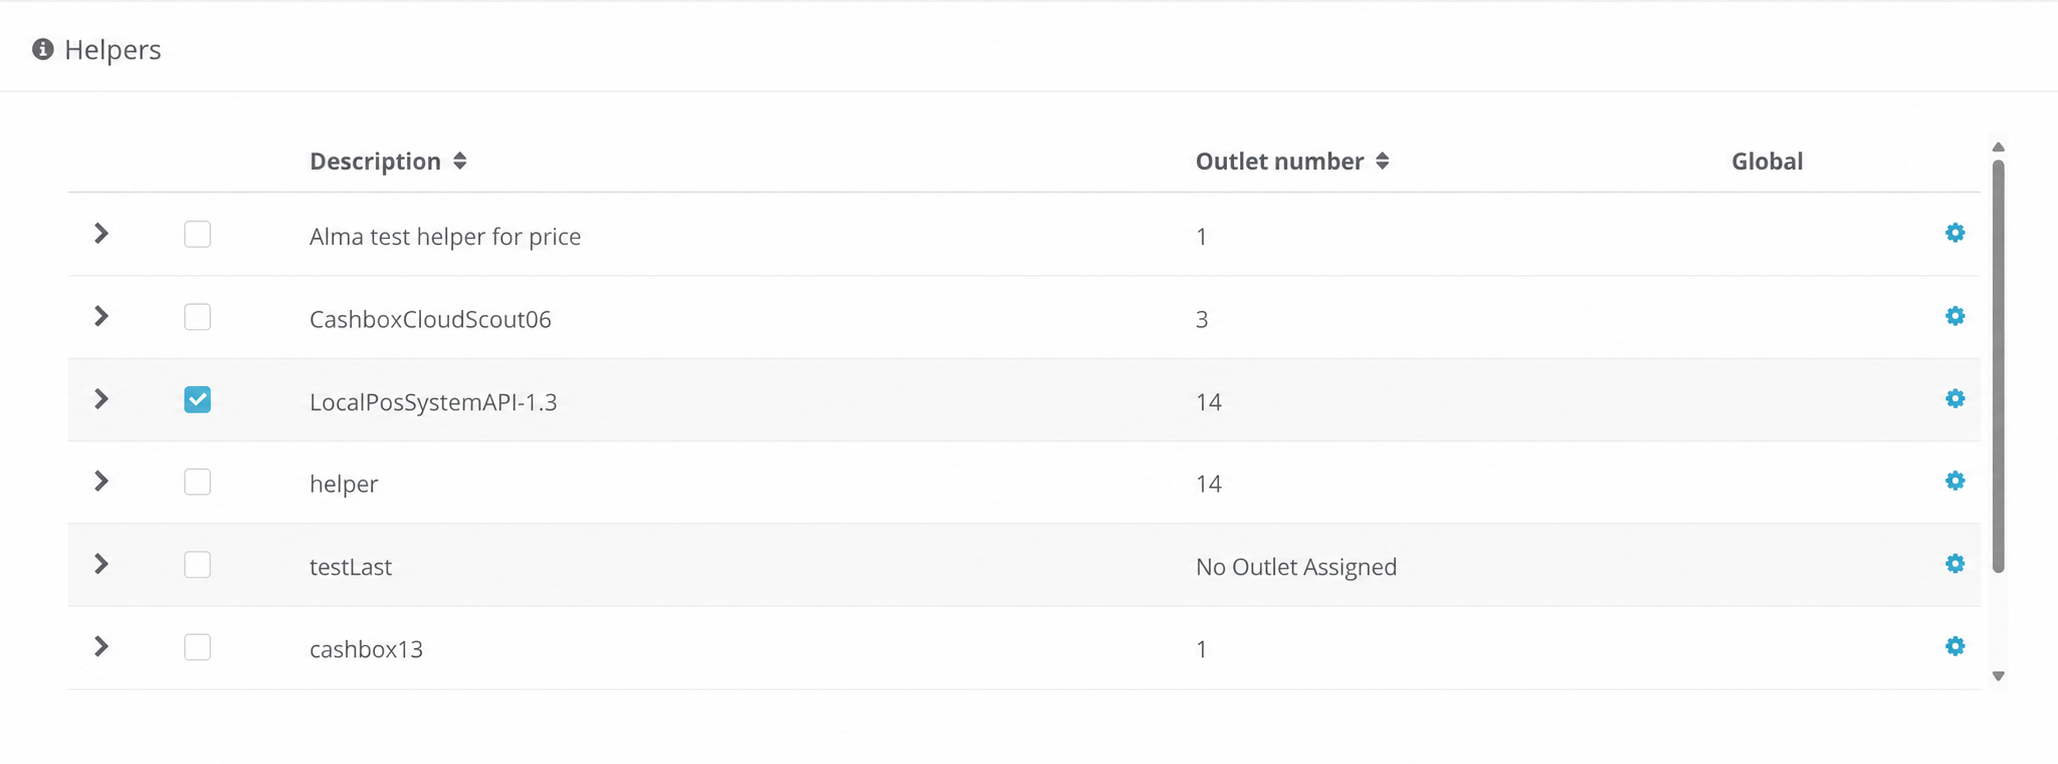
Figure 12. The two CashBoxes: the original 1.2 CashBox and the new 1.3 CashBox.
At this point, you have two CashBoxes: the original 1.2 CashBox and the new 1.3 CashBox with the PosSystem API Helper assigned.
Download the Launcher for the 1.3 CashBox
The 1.3 CashBox requires Launcher 2.0. To download it, navigate to Configuration / CashBox.
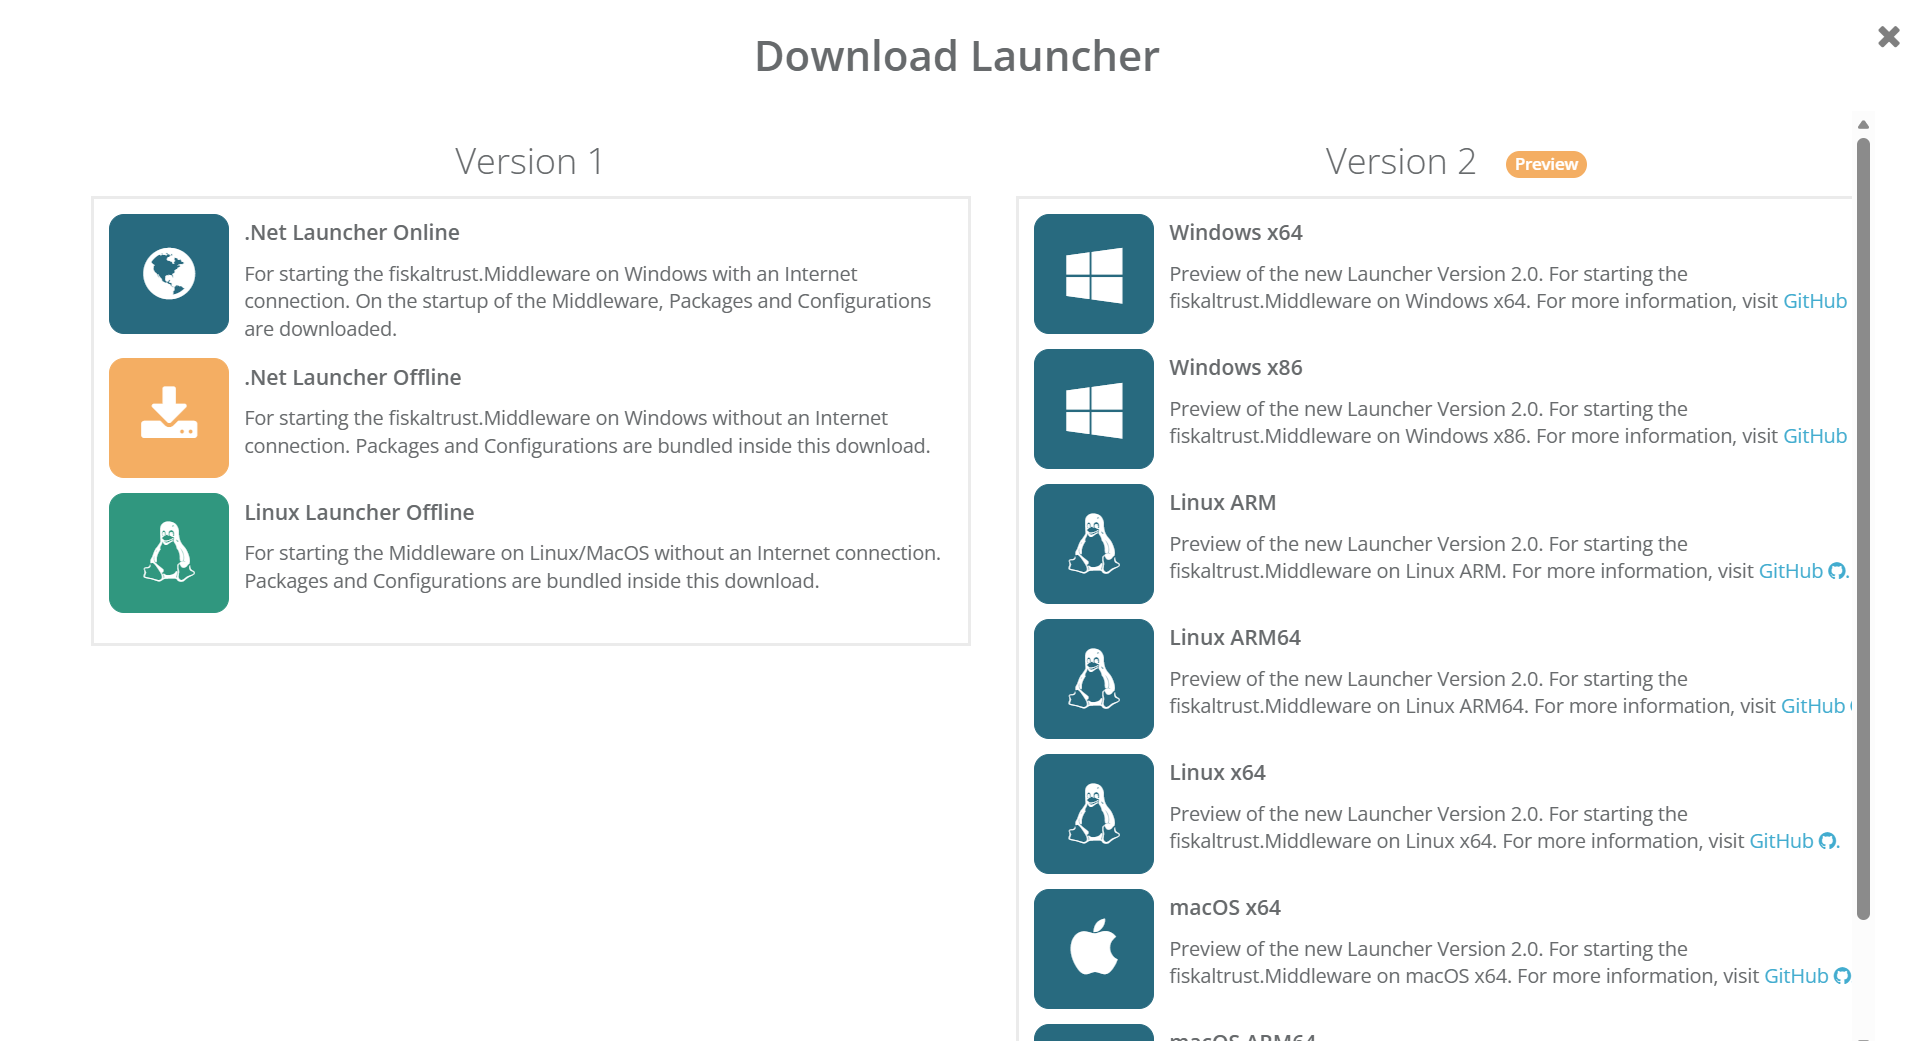
Figure 13. Rebuilding the configuration and downloading the Launcher for the 1.3 CashBox.
| Steps | Description |
|---|---|
| Locate the 1.3 CashBox and click Rebuild configuration. Wait for the success confirmation. |
| Click Download and select the correct Version 2 Launcher architecture for your system. |
Table 12. Steps to download the Launcher for the 1.3 CashBox.
Run the Launcher for the 1.3 CashBox
After downloading the Launcher package, extract it and run launcher-test.cmd (or launcher-test.sh on Unix-based systems) to start the Middleware. For detailed instructions on starting the Launcher and installing it as a service, see Launcher 2.0 Getting Started.
Download the Launcher for the 1.2 CashBox
The 1.2 CashBox supports Launcher version 1. To download it, locate the existing 1.2 CashBox in the Configuration / CashBox view.
| Steps | Description |
|---|---|
| Click Rebuild configuration and wait for the success confirmation. |
| Click Download and select the appropriate Launcher 1.2 or Launcher 1.3 architecture for your system. |
Table 13. Steps to download the Launcher for the 1.2 CashBox.
Run the Launcher for the 1.2 CashBox
Extract the downloaded package and run test.cmd (or test.sh on Unix-based systems) to start the Middleware. For detailed instructions on starting the Launcher and installing it as a service, see Launcher for Windows, Linux & macOS.
Find the Helper URL
To find the Helper URL used to send requests, navigate to Configuration / CashBox.
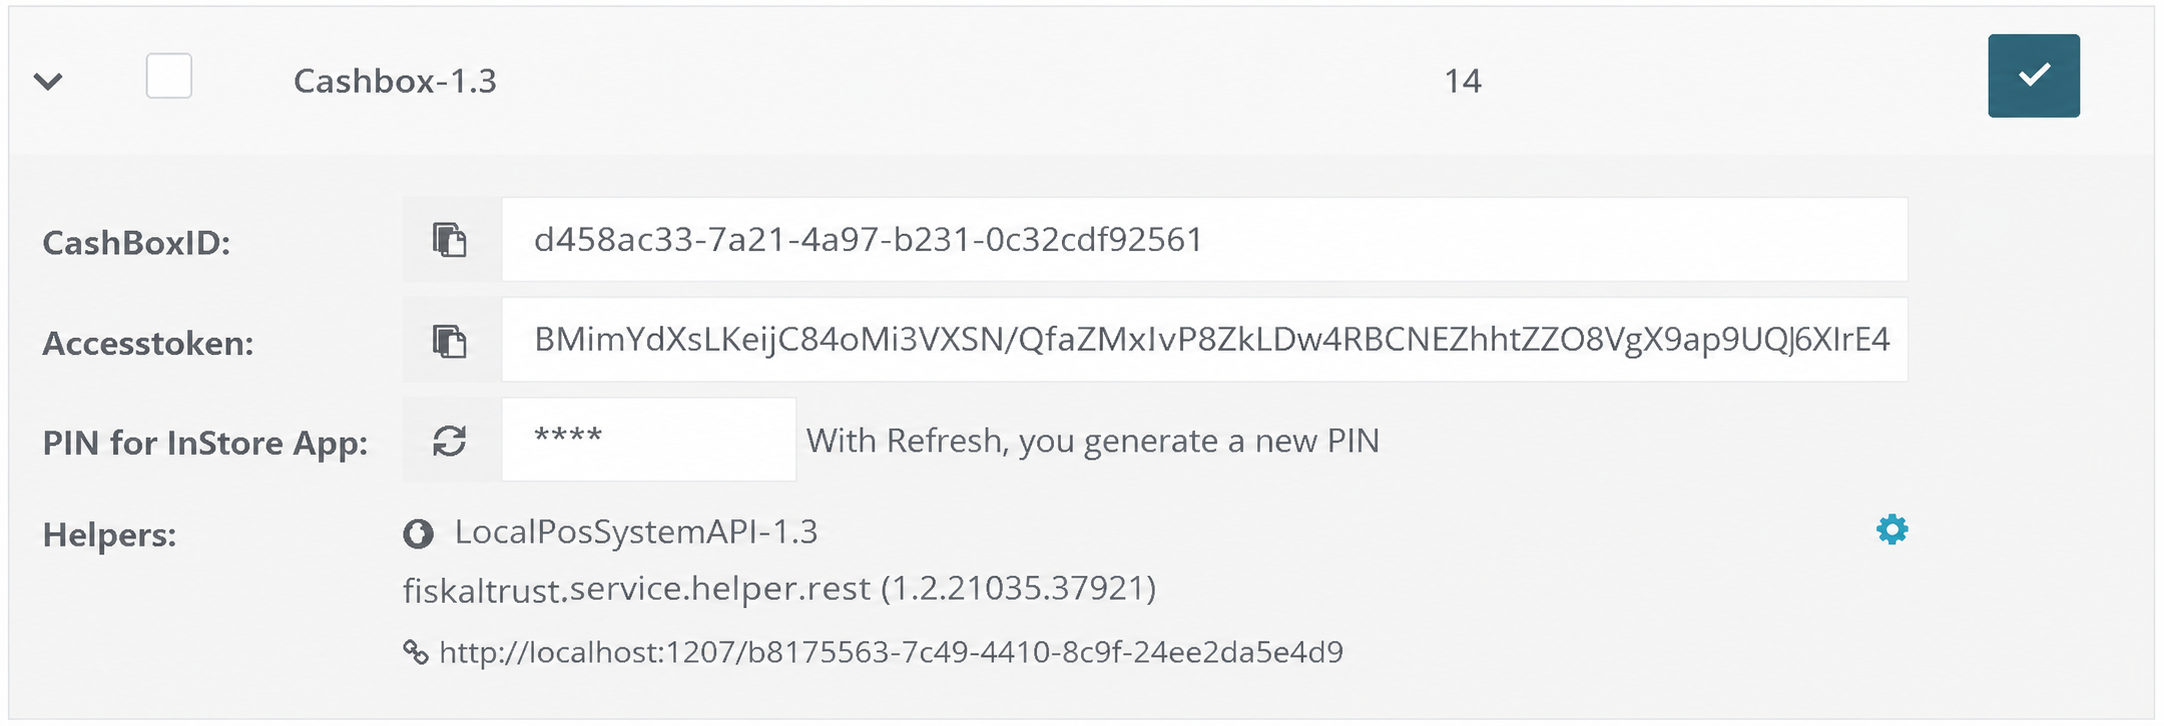
Figure 14. Finding the Helper URL in the 1.3 CashBox configuration.
| Steps | Description |
|---|---|
| Locate the 1.3 CashBox and click the expand arrow to reveal the CashBox configuration inline. |
| The Helper URL is displayed below the PosSystem API Helper entry. Use this URL to send requests to the Middleware. |
Table 14. Steps to find the Helper URL.
Test the LocalPosSystemApi Helper
Once the Middleware is running, verify that the LocalPosSystemApi Helper is working correctly by sending a test request. The easiest way to do this is by using the fiskaltrust Developer Portal, which provides an interactive interface for sending requests to the Middleware and inspecting the responses.

Figure 15. The fiskaltrust Developer Portal landing page.
Select POS System API from the available options.
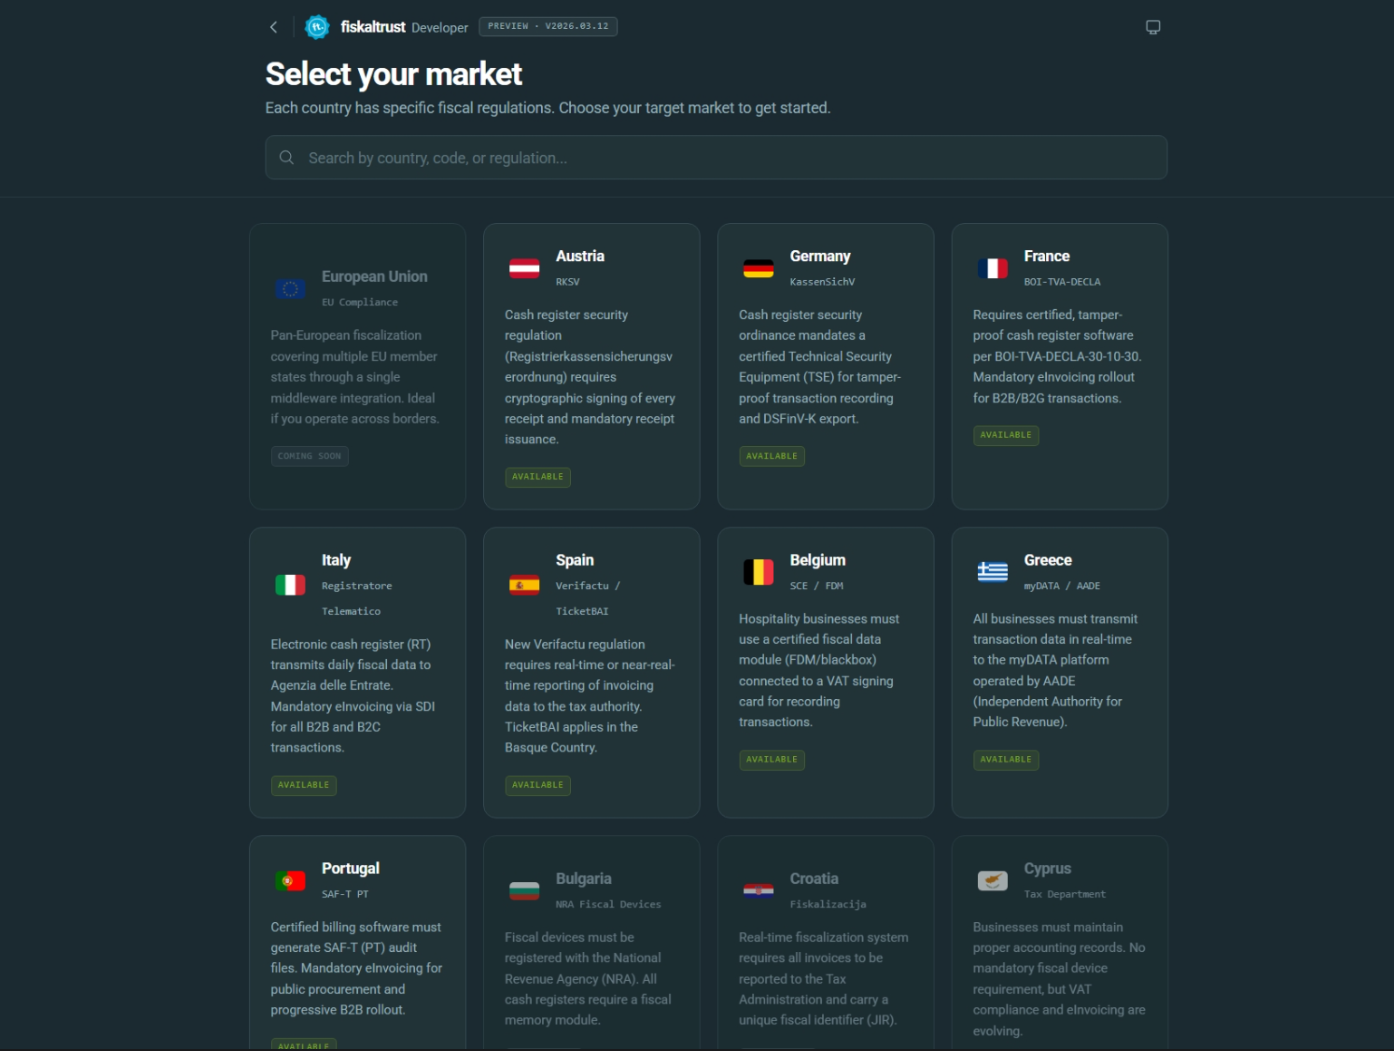
Figure 16. Selecting the market in the Developer Portal.
Select your market, then click Settings in the top-right corner.
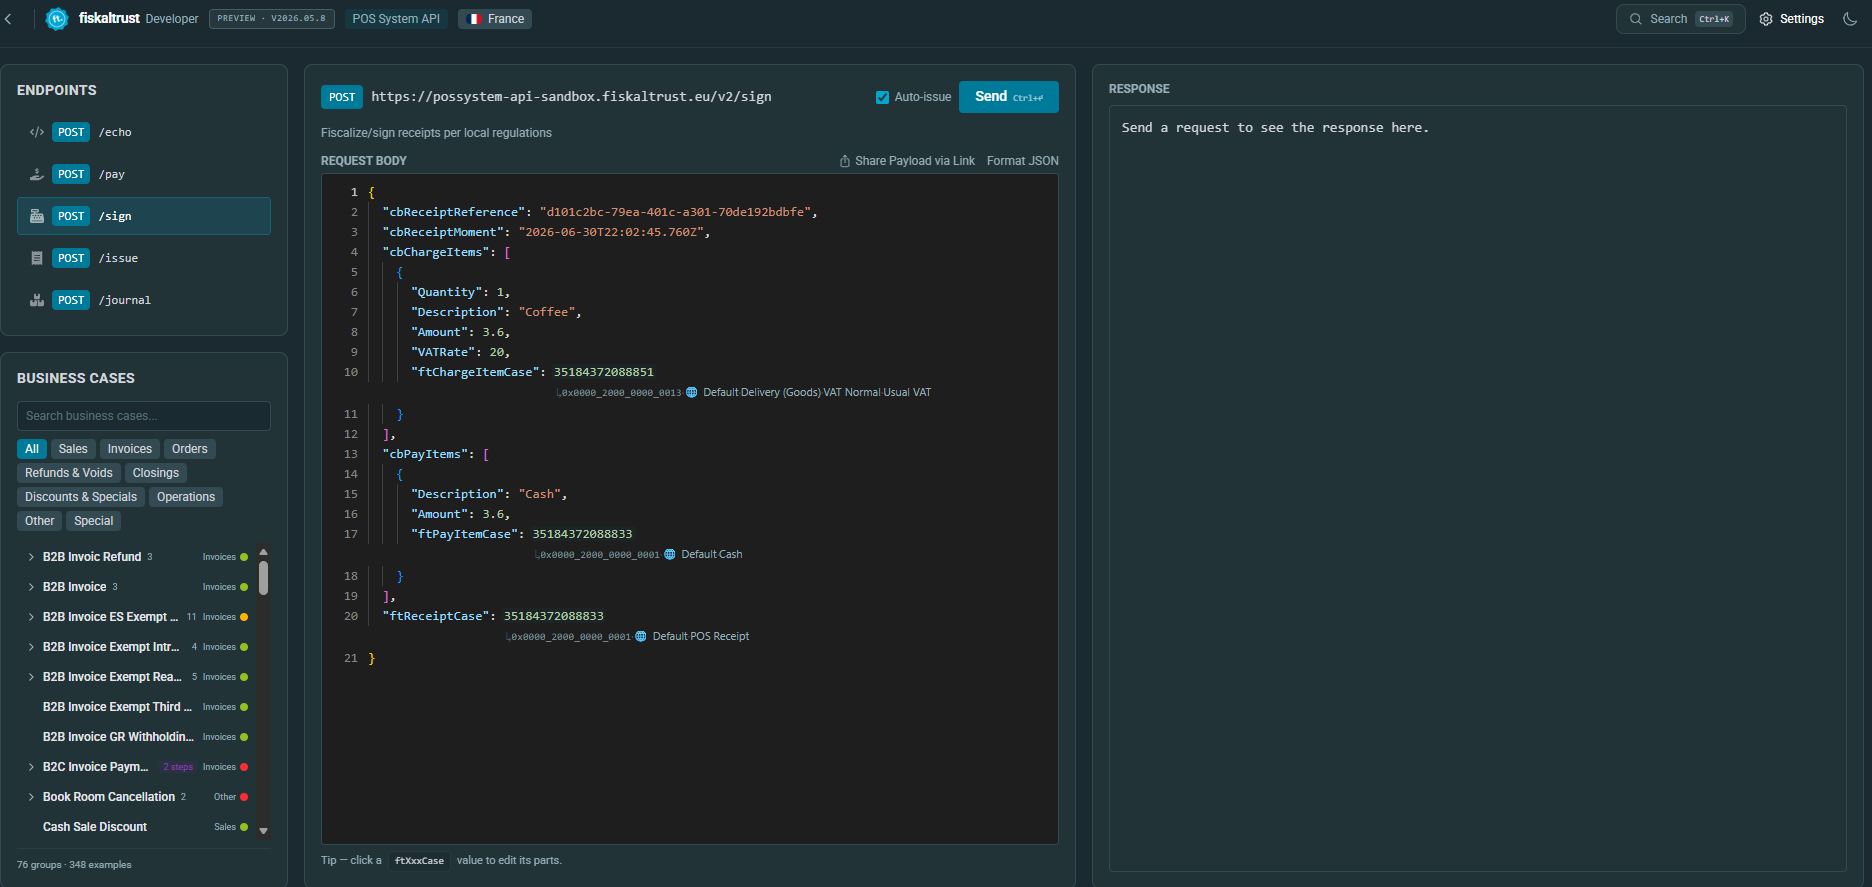
Figure 17. Opening the Settings panel in the Developer Portal.
A settings panel opens where you can configure the connection to the local Middleware.
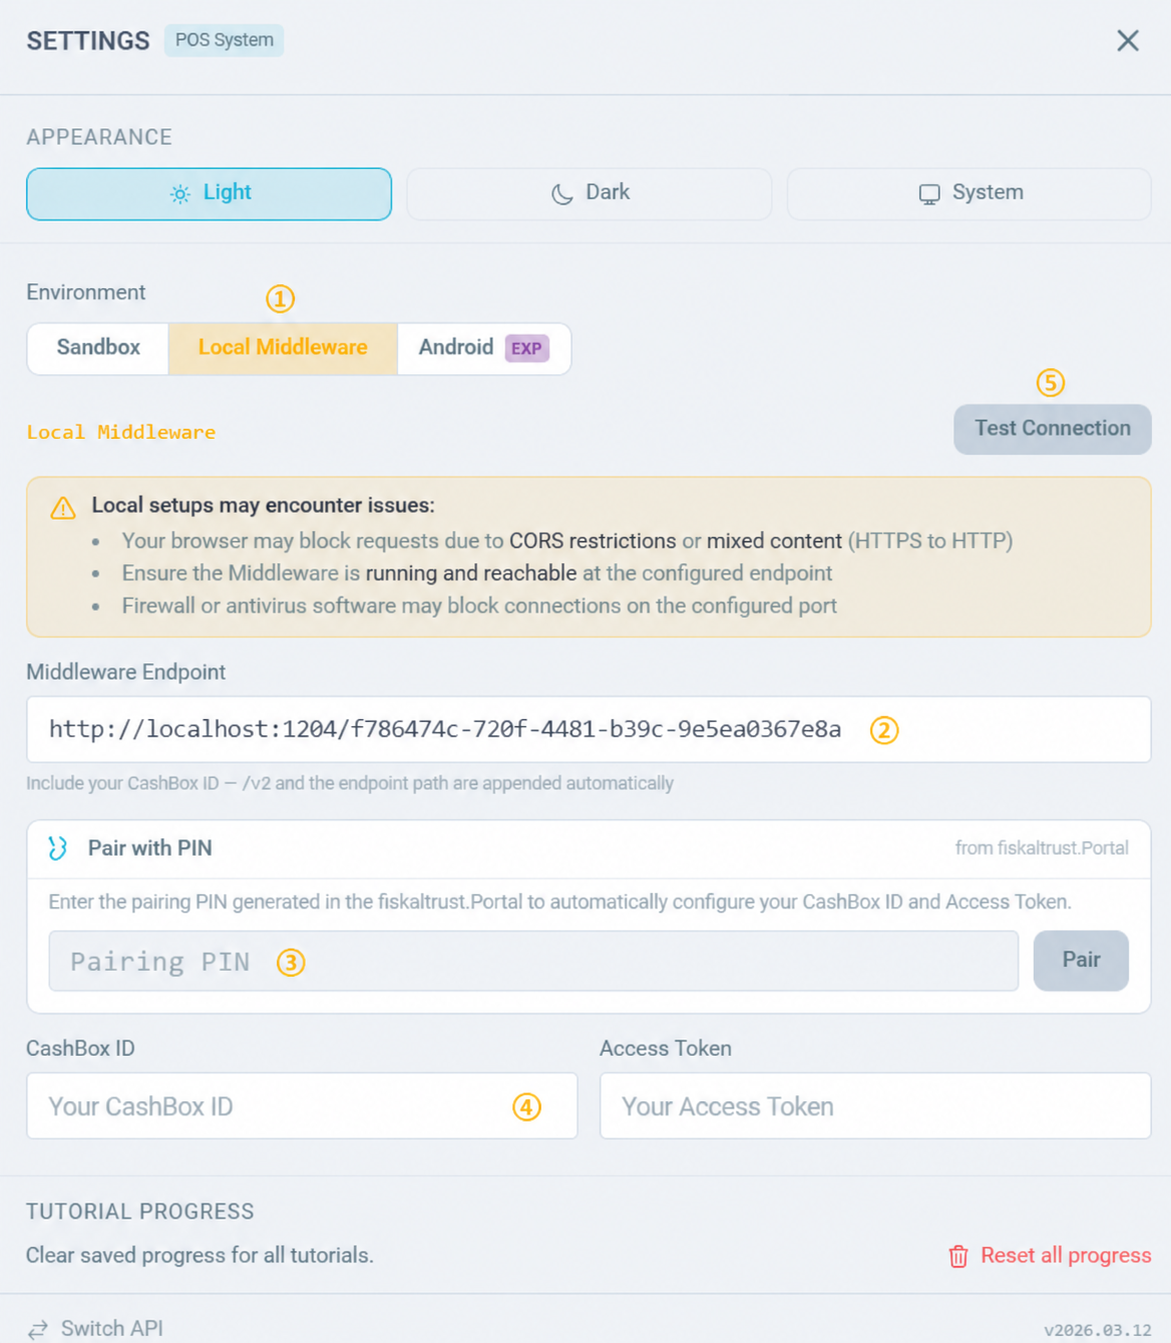
Figure 18. Configuring the connection to the local Middleware.
| Steps | Description |
|---|---|
| In the Environment section, select Local Middleware. |
| In the Middleware Endpoint field, enter the Helper URL from the 1.3 CashBox found in the previous step. |
| Copy the PIN from the Configuration / CashBox page, enter it in the field below, then click Pair. A confirmation message should appear as shown below. |
Table 15. Steps to configure the local Middleware connection and pair the CashBox.

Figure 19. Confirmation that the CashBox ID and Access Token are populated after pairing.
| Steps | Description |
|---|---|
| The CashBox ID and Access Token fields are populated with the values from the existing 1.2 CashBox. |
| Click Test Connection. A green 201 response confirms that the Helper is working correctly. |
Table 16. Steps to verify the Helper connection with a test request.
Close Settings. You can now use the available endpoints to send requests to the Middleware and verify the Helper functionality.