Invitation process
After reading this, you can invite a single PosOperator and invite several PosOperators at once with a CSV file.
A PosCreator invites you, as a PosDealer, to the fiskaltrust.Portal. You invite your PosOperators. Once a PosOperator has an account in the fiskaltrust.Portal, you can transfer fiskaltrust products that you purchased in the Portal shop to that account. For more information, see Business Model.
There are two ways to invite PosOperators:
| Way | Use it for |
|---|---|
| Invitation of a single PosOperator | One PosOperator, for example a new contact, on-site support, or testing in the sandbox. |
| Bulk invitation of PosOperators | Several PosOperators at once, imported from a CSV file. |
Table 1. Ways to invite PosOperators.
You cannot delete an e-mail address entirely in the fiskaltrust.Portal, so you cannot transfer an e-mail address that was used once to any other account. Test the invitation process in the sandbox first to avoid problems with e-mail addresses in the production system.
Prerequisites
- Your account has the PosDealer role. Only PosDealers can invite PosOperators; PosCreators and consultants cannot. Both can additionally activate the PosDealer role to get these options in the fiskaltrust.Portal. For more information, see Company Roles.
- You have checked the invitation settings as described in Preparation of invitations.
Preparation of invitations
Check the invitation settings before you invite PosOperators, regardless of which way you use.
- Choose
PosDealer>PosOperatorsto see the PosOperators already assigned to your account. - Choose
PosDealer>Invitation. In Austria, Germany and France,PosOperator>Invitationopens the same page. - In
PosOperator invitation settings, check or change the settings described in Table 2. - Continue with Invitation of a single PosOperator or Bulk invitation of PosOperators.
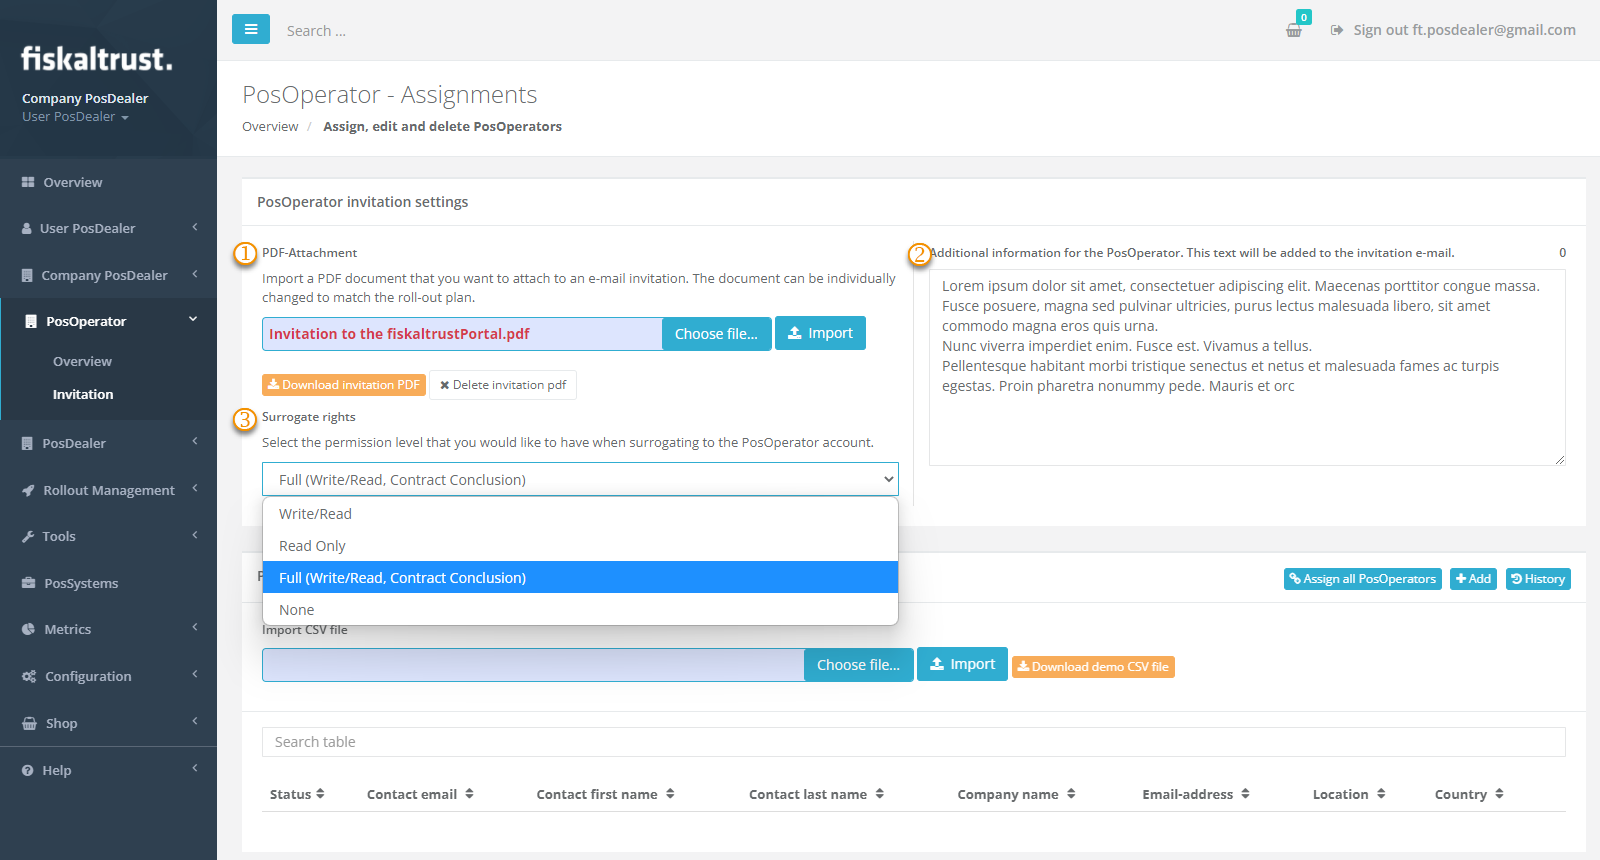
Figure 1. PosOperator invitation settings in the fiskaltrust.Portal.
| Setting | Description |
|---|---|
 | PDF-Attachment: Attach a document to the e-mail invitation. Use it as an accompanying letter that explains that you, as a PosDealer, are extending your offers and invite your PosOperators to register with the fiskaltrust.Portal via the confirmation link. This avoids confusion when PosOperators receive an e-mail from an unknown sender such as sandbox@fiskaltrust.TLD or robot@fiskaltrust.TLD. Select the PDF file with Choose file and upload it with Import. After the upload, Download invitation pdf and Delete invitation pdf are available. |
 | Additional information for the PosOperator. This text will be added to the invitation e-mail.: Add your own text of up to 1000 characters to the automated e-mail invitation (see Preview of the e-mail invitation). Use it to inform your PosOperators personally, for the same reason as the PDF attachment. The counter next to the field shows the remaining characters. The text is saved when you leave the field. |
 | Surrogate rights: The permission level you get when you switch to the PosOperator's account (surrogating). The options are Full (Write/Read, Contract Conclusion) (default), Write/Read, Read Only and None. Select Full (Write/Read, Contract Conclusion). With any other option you can access the PosOperator's account, but you cannot conclude contracts on the PosOperator's behalf, which is necessary for cooperation with third parties. For more information, see Surrogating. |
Table 2. Invitation settings.
Invitation of a single PosOperator
Invite a single PosOperator, for example, when you give on-site support to a PosOperator who wants to use the fiskaltrust services immediately when a POS system is put into operation, or when you test the fiskaltrust.Portal and its processes in the sandbox.
Depending on the country, when a PosOperator is registered for the first time, further master data can be retrieved from the relevant authority and checked by entering a tax number.
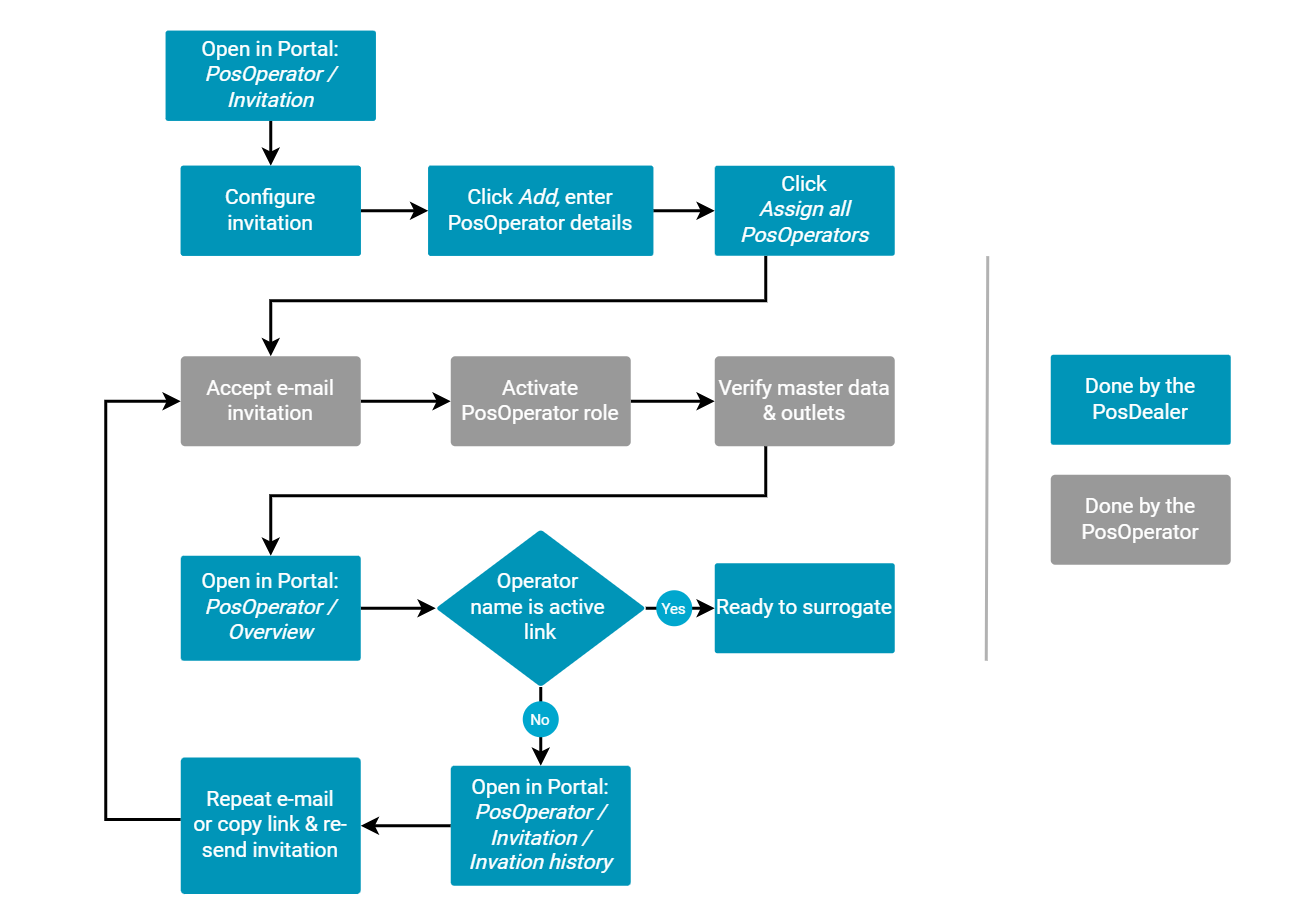
Figure 2. Process of inviting a single PosOperator.
Steps
- Choose
PosDealer>Invitation. - Check the settings as described in Preparation of invitations.
- Choose
+Add. - Fill in the mandatory fields. They are required so that the PosOperator can be found and assigned correctly in the fiskaltrust.Portal via the e-mail address:
Company data: company name, e-mail address, address line 1, postal code, city, countryUser data: first name, last name, contact e-mail address
- Fill in the tax identification numbers. They are not mandatory for the invitation, but they and their validation are essential for the correct management of the cash register systems (for example AccountIdVat, AccountIdGln, AccountUStIdNr).
- Choose
Save. The PosOperator is added to the listPosOperators that should be invited. - Choose
Invite all PosOperatorsto send the e-mail invitation.
If the invitation does not reach the PosOperator, see Managing the invitations.
Preview of the e-mail invitation
- Austria
- Belgium
- France
- Germany
- Greece
- Italy
- Poland
- Portugal
- Spain
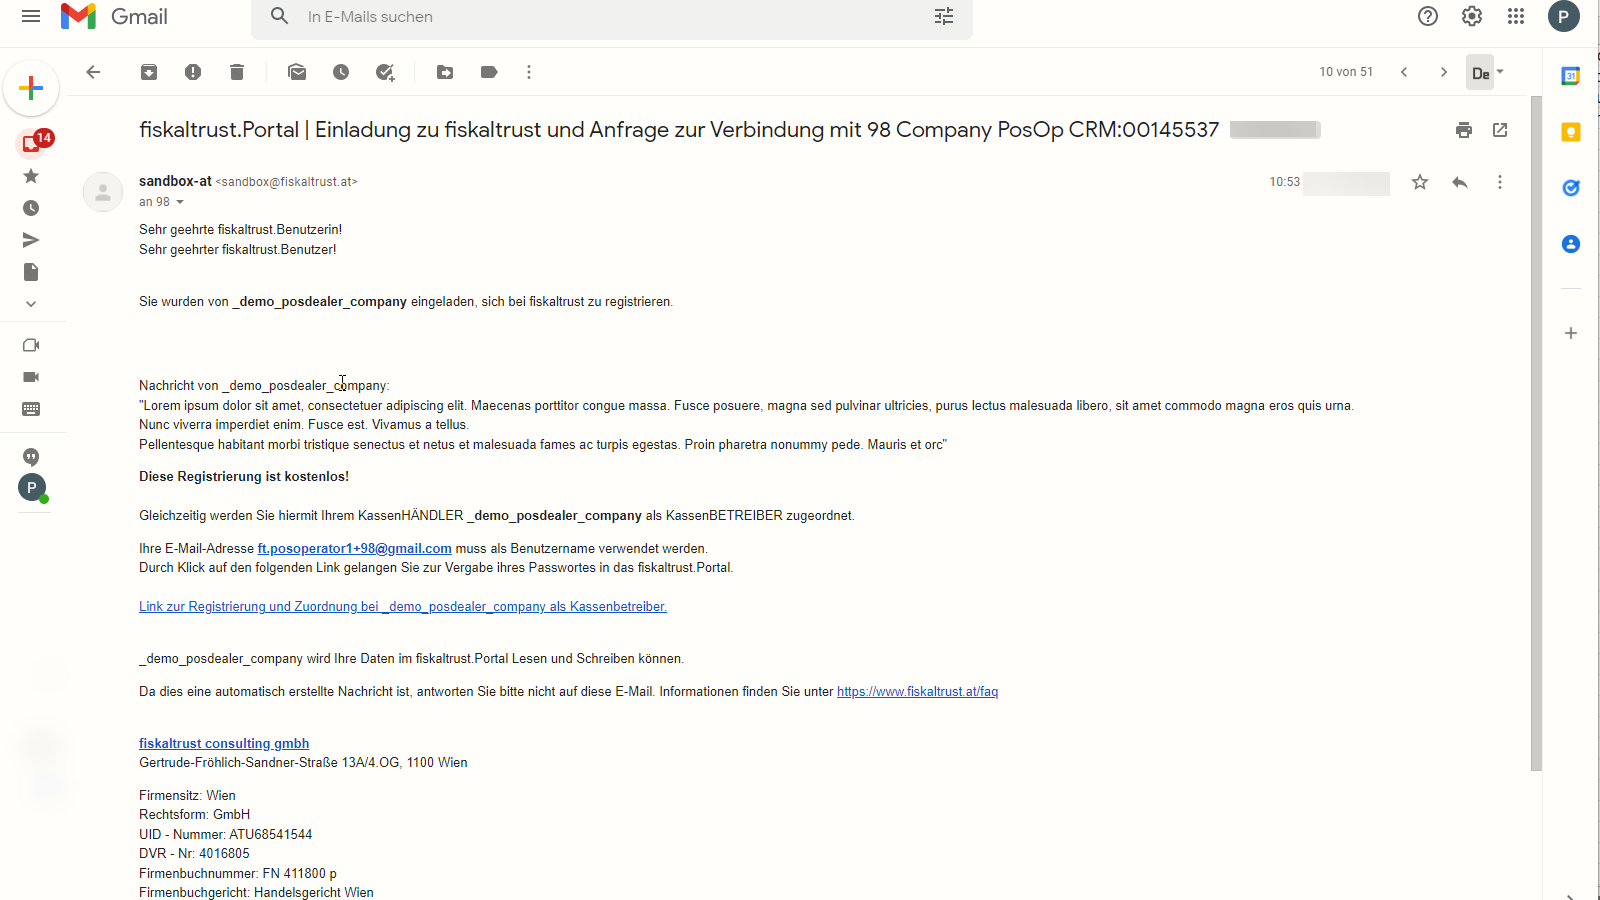
Country-specific details in progress.
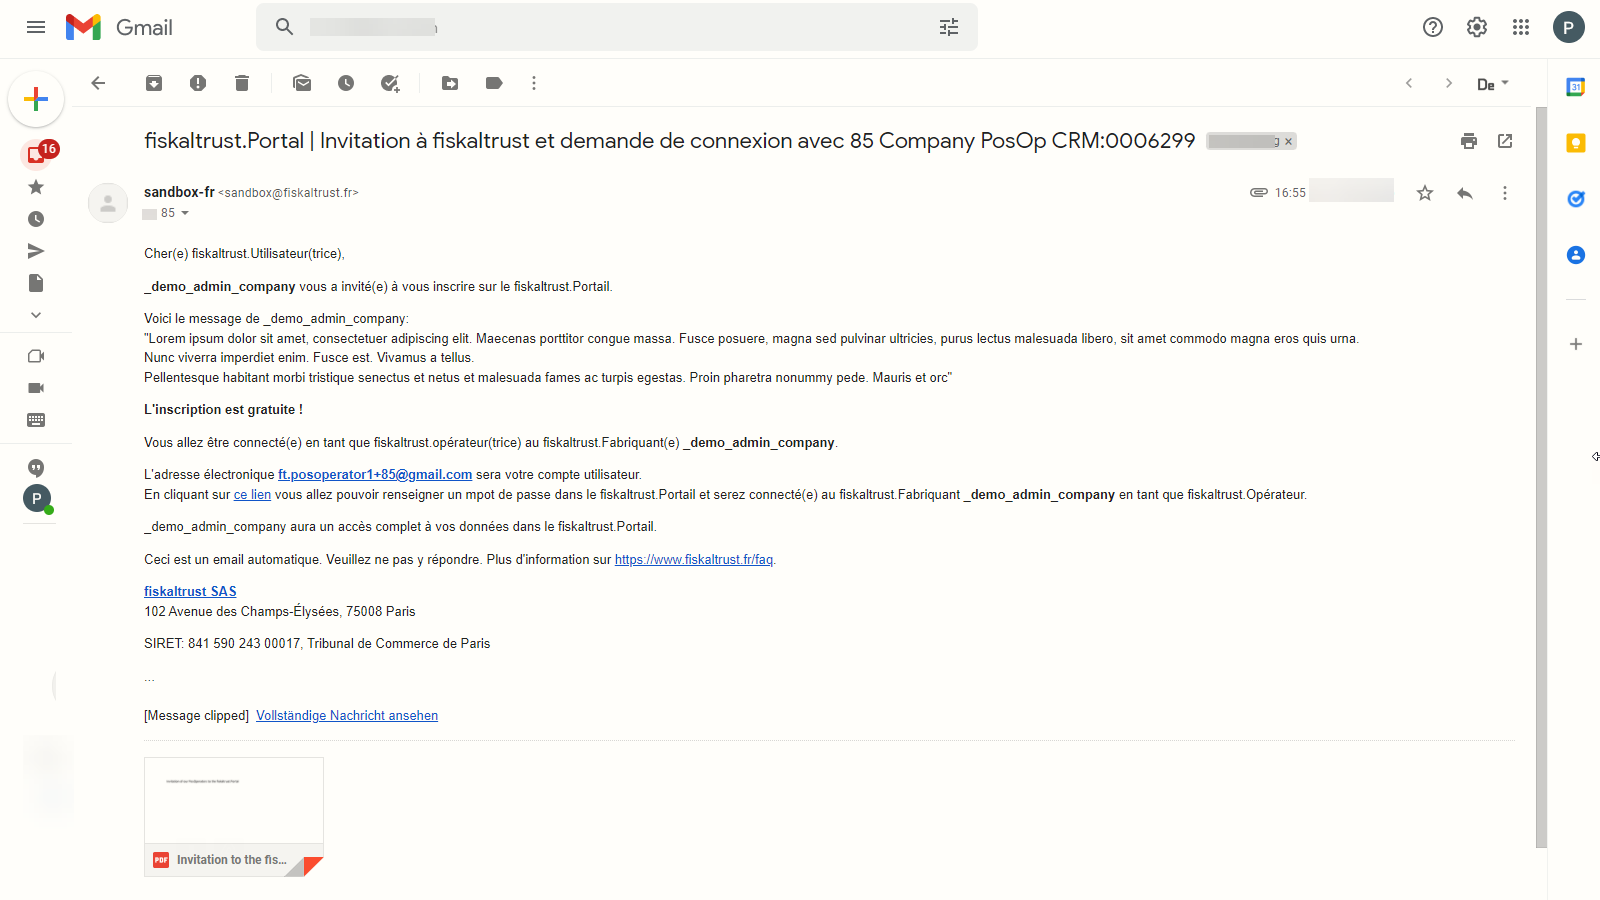
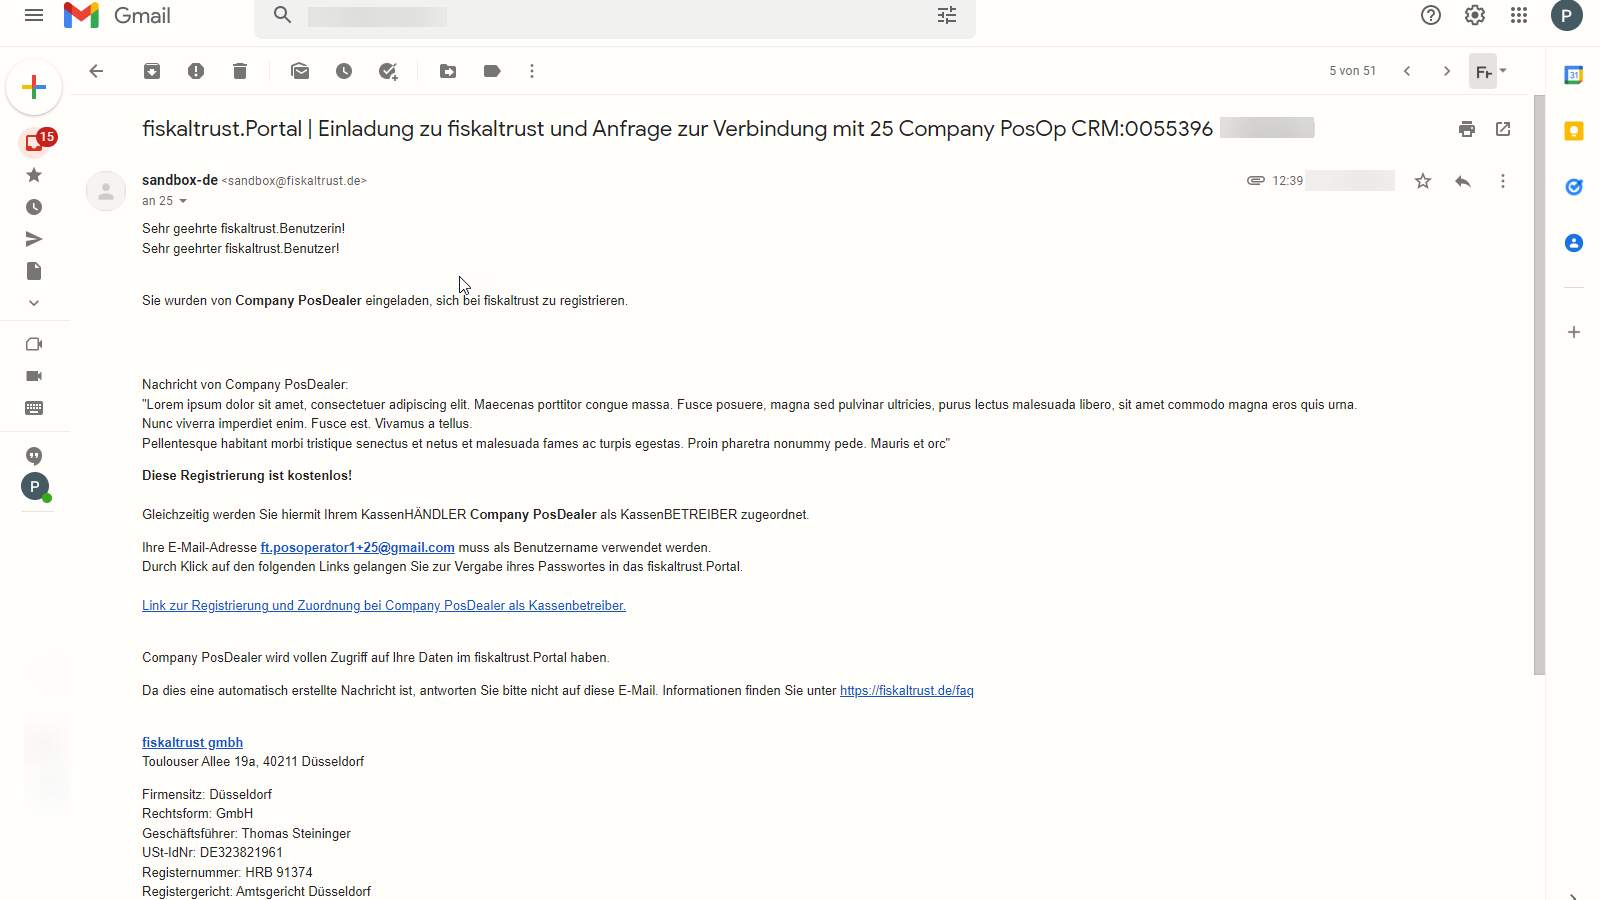
Country-specific details in progress.
Country-specific details in progress.
Country-specific details in progress.
Country-specific details in progress.
Country-specific details in progress.
Bulk invitation of PosOperators
Import a CSV file to invite many business partners at once. The fiskaltrust.Portal creates and sends the invitations automatically, so the data of your business partners must be correct. Check the preparation first, so that invitations are not mistakenly treated as spam. The fiskaltrust.Portal provides a demo CSV file with the required structure; the columns are described in Fields of the CSV file.
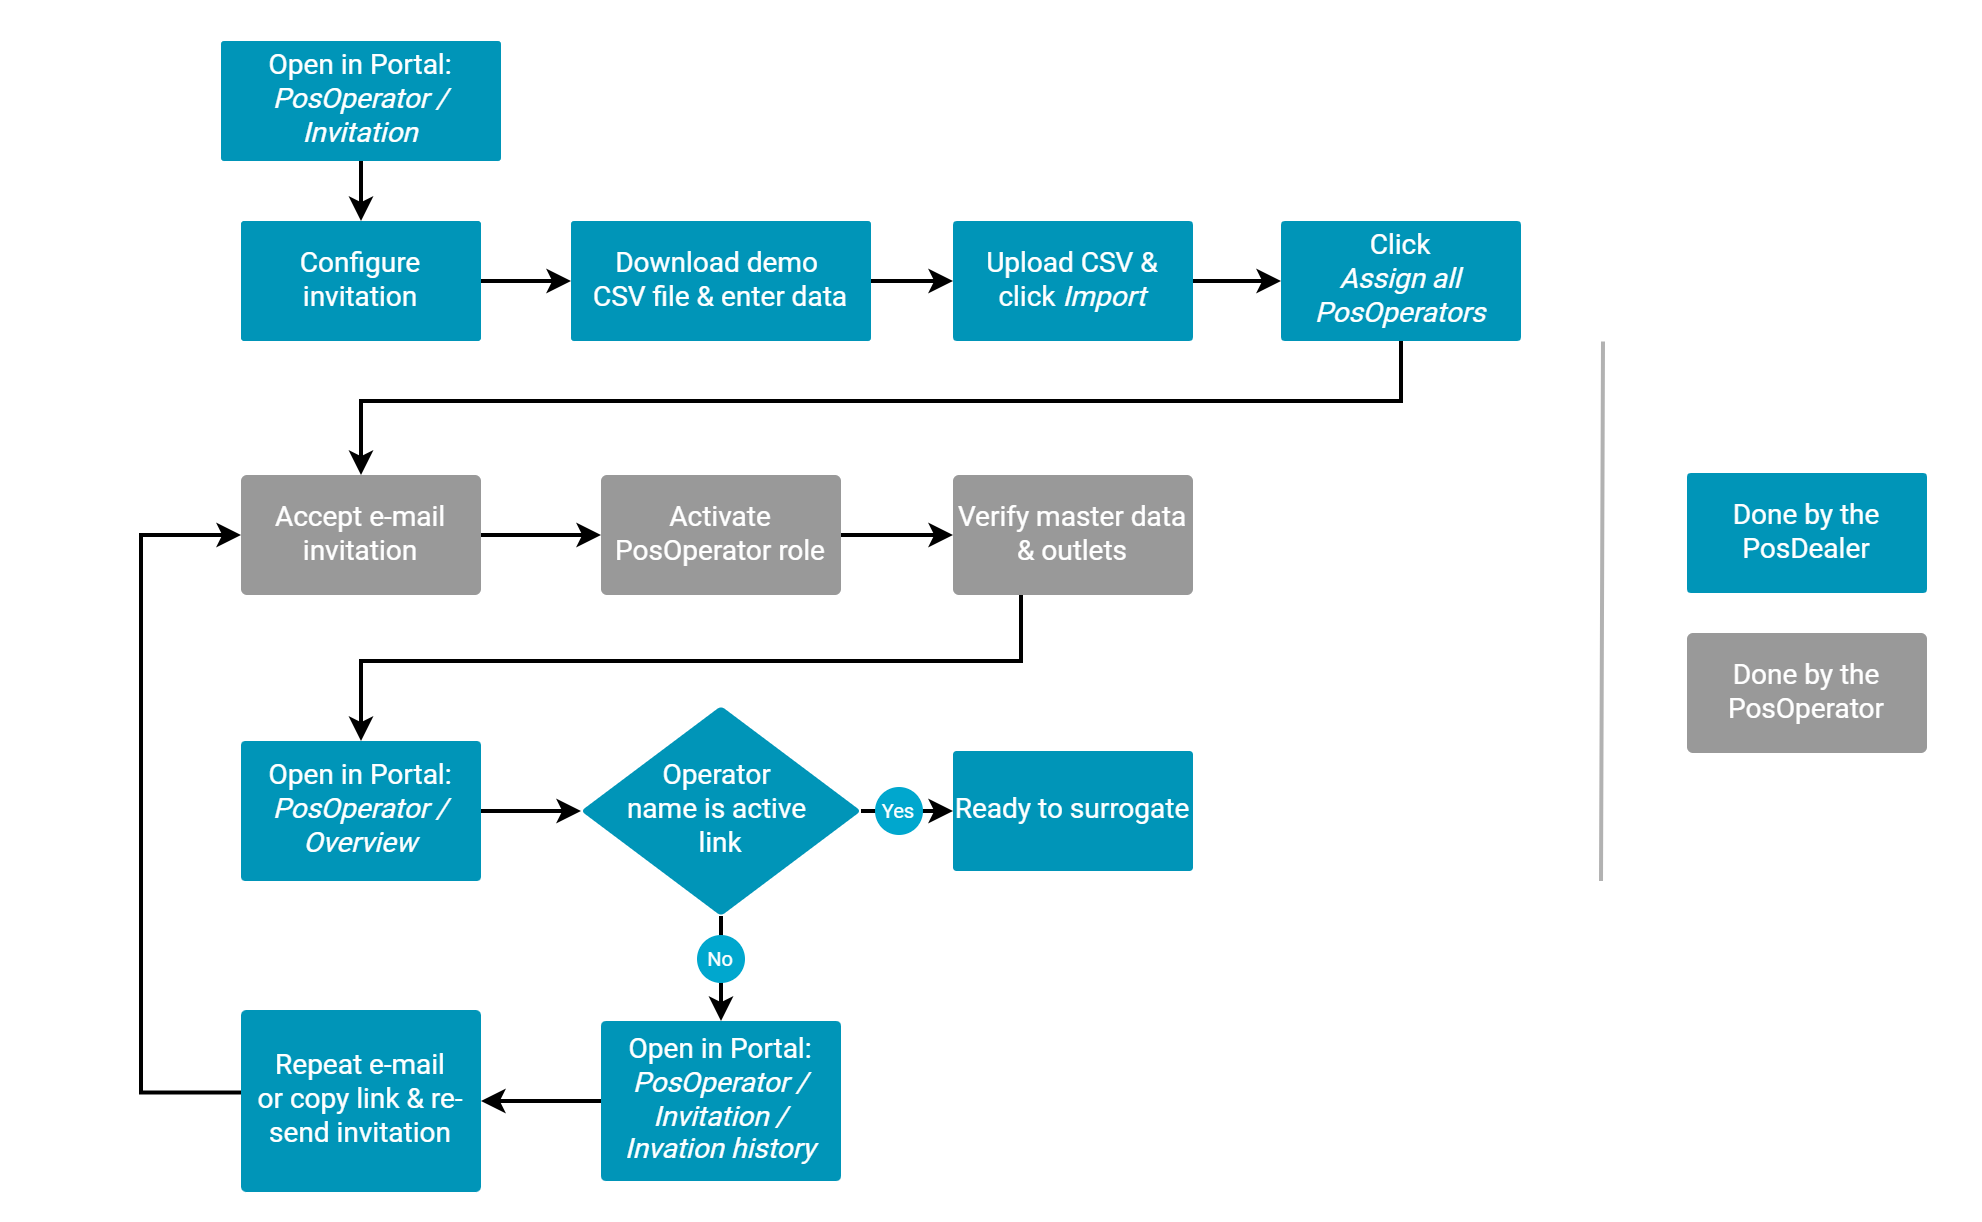
Figure 3. Process of the bulk invitation of PosOperators.
Steps
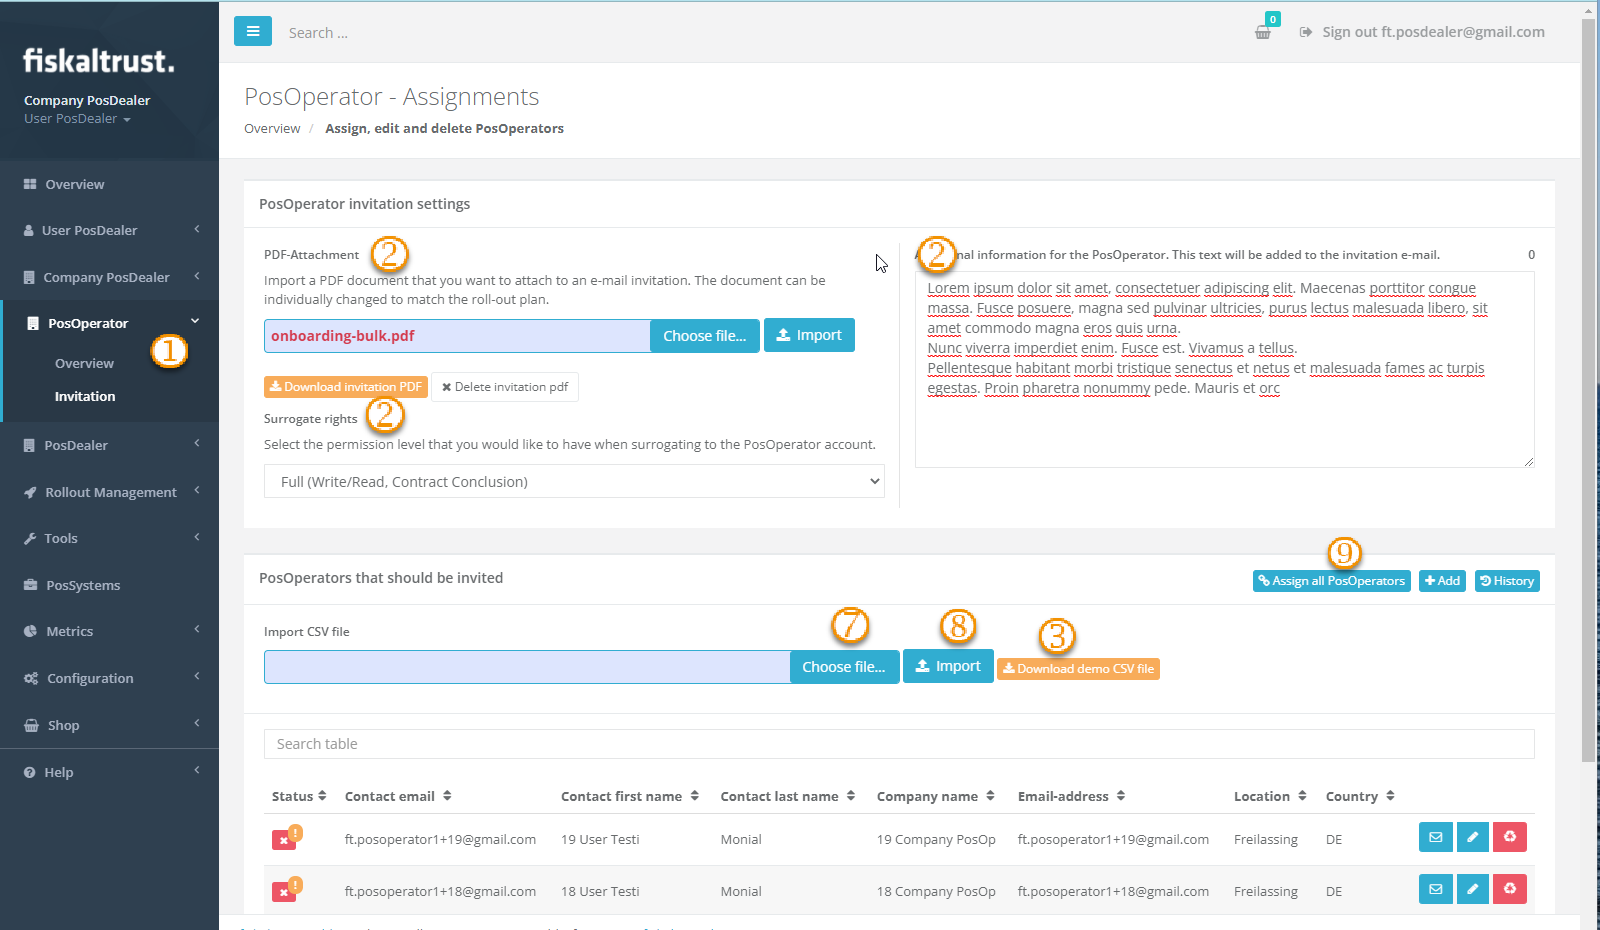
Figure 4. Bulk invitation via CSV file in the fiskaltrust.Portal.
| Step | Description |
|---|---|
| Choose PosDealer > Invitation. |
| Check the settings as described in Preparation of invitations. |
| Choose Download demo CSV file. |
 | Open the demo CSV file. |
 | Add the data of the PosOperators as described in Fields of the CSV file and save the file as a CSV file. |
 | Go back to the fiskaltrust.Portal and choose PosDealer > Invitation. |
 | In PosOperators that should be invited, under Import CSV file, select your CSV file with Choose file. |
 | Choose Import. The data is uploaded and checked for duplicate or incomplete records. You can check and complete each record. If records are incomplete, the import error page opens (see Handling error messages). |
 | Choose Invite all PosOperators to send the e-mail invitation to each business partner in your CSV file. For a preview of the e-mail, see Preview of the e-mail invitation. |
Table 3. Steps of the bulk invitation, shown in Figure 4.
Fields of the CSV file
- Austria
- Belgium
- France
- Germany
- Greece
- Italy
- Poland
- Portugal
- Spain
| Field | Description | Mandatory |
|---|---|---|
| AccountName | Company name, written exactly as in the commercial register. | yes |
| AccountEMail | General e-mail address of the company. Important: All information and all invoices are sent to this e-mail address. | yes 1 |
| AccountAddressLine1 | Address, first line of the company. | yes |
| AccountAddressLine2 | Address, second line of the company. | no |
| AccountPostalCode | Postal code of the company's address. | yes |
| AccountCity | City of the company's address. | yes |
| AccountCountry | ISO code (3166 ALPHA-2) of the country of the company's address. | yes |
| AccountWeb | URL of the company's website. | no |
| AccountPhone | Company phone number. | no |
| AccountIdVat | VAT number of the company, for example ATU12345678. Important for the reports to FinanzOnline. Important: This is one of the identification criteria for the legalization of the service. | one of 2 |
| AccountIdTax | Tax office tax number of the company. Enter 9 digits without special characters and without spaces (2 digits tax office number, 3 digits "/" 4 digits tax number). Important: This is one of the identification criteria for the legalization of the service. | one of 2 |
| AccountIdGln | GLN (https://firmen.wko.at) of the company, for example 1234567890123. | no |
| AccountIdFibu | Company register number (if available). | no |
| ContactFirstName | First name of the primary contact. | yes |
| ContactLastName | Last name of the primary contact. | yes |
| ContactEMail | E-mail address of the primary contact. Important: This e-mail address is the user's login to the newly created company. | yes |
| ContactMobilePhone | Mobile phone number of the primary contact. | no |
| ContactTitle | (Academic) title of the primary contact (before the name). Legacy column 3. | no |
| ContactSuffix | Name suffix of the primary contact (after the name). Legacy column 3. | no |
Table 1. Columns of the CSV file for the bulk invitation (Austria).
1 Optionally, you can also provide a dedicated e-mail address for invoices in Company info > Master data (Primary Billing E-Mail).
2 The CSV import requires at least one business identifier: the VAT number (AccountIdVat) or the TIN (AccountIdTax). The other tax identification numbers are optional. All tax identification numbers are the basis for correct cash register management and a prerequisite for using third-party services.
3 Not included in the current demo CSV file. Older CSV files with this column can still be imported; the column is ignored.
Country-specific details in progress.
| Field | Description | Mandatory |
|---|---|---|
| AccountName | Company name, written exactly as in the commercial register. | yes |
| AccountEMail | General e-mail address of the company. Important: All information and all invoices are sent to this e-mail address. | yes 1 |
| AccountAddressLine1 | Address, first line of the company. | yes |
| AccountAddressLine2 | Address, second line of the company. | no |
| AccountPostalCode | Postal code of the company's address. | yes |
| AccountCity | City of the company's address. | yes |
| AccountCountry | ISO code (3166 ALPHA-2) of the country of the company's address. | yes |
| AccountWeb | URL of the company's website. | no |
| AccountPhone | Company phone number. | no |
| AccountIdVat | VAT identification number, for example FR3216549801. Important: This is one of the identification criteria for the legalization of the service. | one of 2 |
| AccountIdTax | Important: This is one of the identification criteria for the legalization of the service. | one of 2 |
| AccountIdGln | Global Location Number (GLN), for example 1234567890123. Request: https://www.gs1.org/standards/id-keys/gln Important: This is one of the identification criteria for the legalization of the service. | no 2 |
| AccountIdSiret | Number of the identification system for the establishment directory (Système d’identification du répertoire des établissements), for example 321654980. Important: This is one of the identification criteria for the legalization of the service. | no 2 |
| ContactFirstName | First name of the primary contact. | yes |
| ContactLastName | Last name of the primary contact. | yes |
| ContactEMail | E-mail address of the primary contact. Important: This e-mail address is the user's login to the newly created company. | yes |
| ContactMobilePhone | Mobile phone number of the primary contact. | no |
| ContactTitle | (Academic) title of the primary contact (before the name). Legacy column 3. | no |
| ContactSuffix | Name suffix of the primary contact (after the name). Legacy column 3. | no |
Table 1. Columns of the CSV file for the bulk invitation (France).
1 Optionally, you can also provide a dedicated e-mail address for invoices in Company info > Master data (Primary Billing E-Mail).
2 The CSV import requires at least one business identifier: the VAT number (AccountIdVat) or the TIN (AccountIdTax). The other tax identification numbers are optional. All tax identification numbers are the basis for correct cash register management and a prerequisite for using third-party services.
3 Not included in the current demo CSV file. Older CSV files with this column can still be imported; the column is ignored.
| Field | Description | Mandatory |
|---|---|---|
| AccountName | Company name, written exactly as in the commercial register. | yes |
| AccountEMail | General e-mail address of the company. Important: All information and all invoices are sent to this e-mail address. | yes 1 |
| AccountAddressLine1 | Address, first line of the company. | yes |
| AccountAddressLine2 | Address, second line of the company. | no |
| AccountPostalCode | Postal code of the company's address. | yes |
| AccountCity | City of the company's address. | yes |
| AccountCountry | ISO code (3166 ALPHA-2) of the country of the company's address. | yes |
| AccountWeb | URL of the company's website. | no |
| AccountPhone | Company phone number. | no |
| AccountUStIdNr | VAT ID number (USt-IdNr.), for example DE999999999. It uniquely identifies a company within the European Union for sales tax purposes. Important: This is one of the identification criteria for the legalization of the service. | one of 2 |
| AccountStIdNr | Tax number (St.-Nr.) that the tax office issues to every taxable person (natural or legal person) and under which the person or company is managed at the tax office. Its structure differs by federal state. Important: This is one of the identification criteria for the legalization of the service. | one of 2 |
| ContactFirstName | First name of the primary contact. | yes |
| ContactLastName | Last name of the primary contact. | yes |
| ContactEMail | E-mail address of the primary contact. Important: This e-mail address is the user's login to the newly created company. | yes |
| ContactMobilePhone | Mobile phone number of the primary contact. | no |
| ContactTitle | (Academic) title of the primary contact (before the name). Legacy column 3. | no |
Table 1. Columns of the CSV file for the bulk invitation (Germany).
1 Optionally, you can also provide a dedicated e-mail address for invoices in Company info > Master data (Primary Billing E-Mail).
2 The CSV import requires at least one business identifier: the VAT ID number (AccountUStIdNr) or the tax number (AccountStIdNr). The import error message names these fields AccountIdVat and AccountIdTax. Both tax identification numbers are the basis for correct cash register management and a prerequisite for using third-party services.
3 Not included in the current demo CSV file. Older CSV files with this column can still be imported; the column is ignored.
Country-specific details in progress.
Country-specific details in progress.
Country-specific details in progress.
Country-specific details in progress.
Country-specific details in progress.
Handling error messages
If mandatory fields in the CSV file are empty or wrong, the import error page lists each error with its line (Line) and message (Error).
- Note the error messages.
- Add the missing data in the respective lines of the CSV file.
- Choose
Backand import the corrected file again.
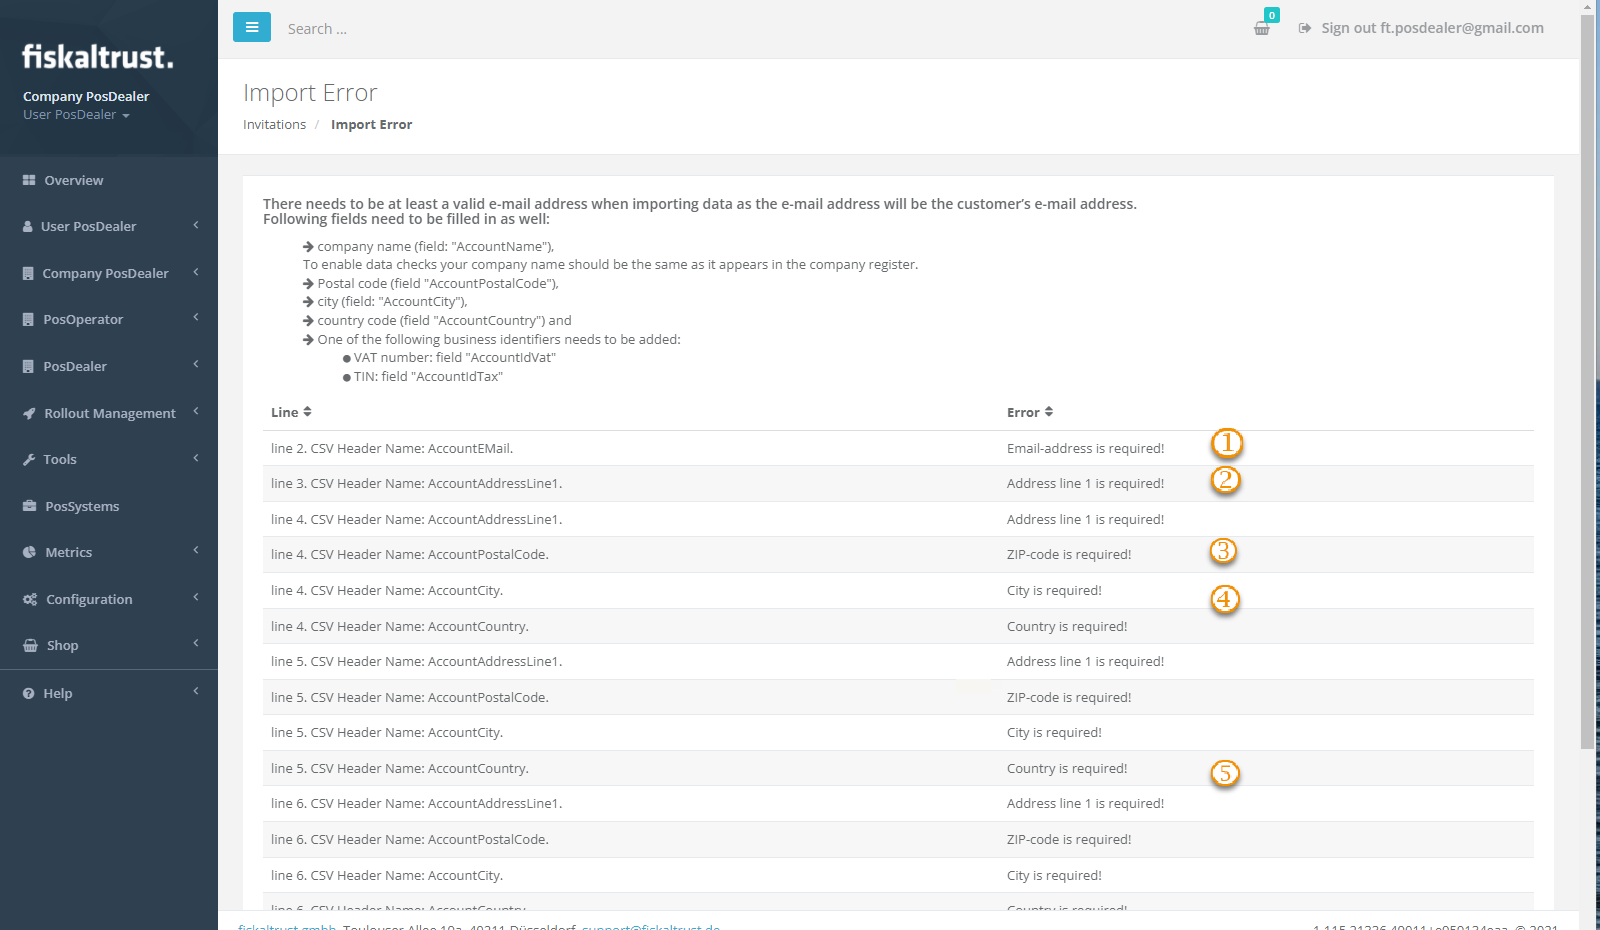
Figure 5. Import error messages after uploading an incomplete CSV file.
| Message | Description |
|---|---|
| Email-address is required! |
| Address line 1 is required! |
| ZIP-code is required! |
| City is required! |
| Country is required! |
Table 4. Import error messages for missing mandatory CSV fields.
Managing the invitations
If the preparation is complete, the invitation process runs automatically. If problems arise, you can fix most of them yourself. For example, if a PosOperator says that no e-mail invitation arrived, check the invitation history.
Troubleshooting
Status and error messages
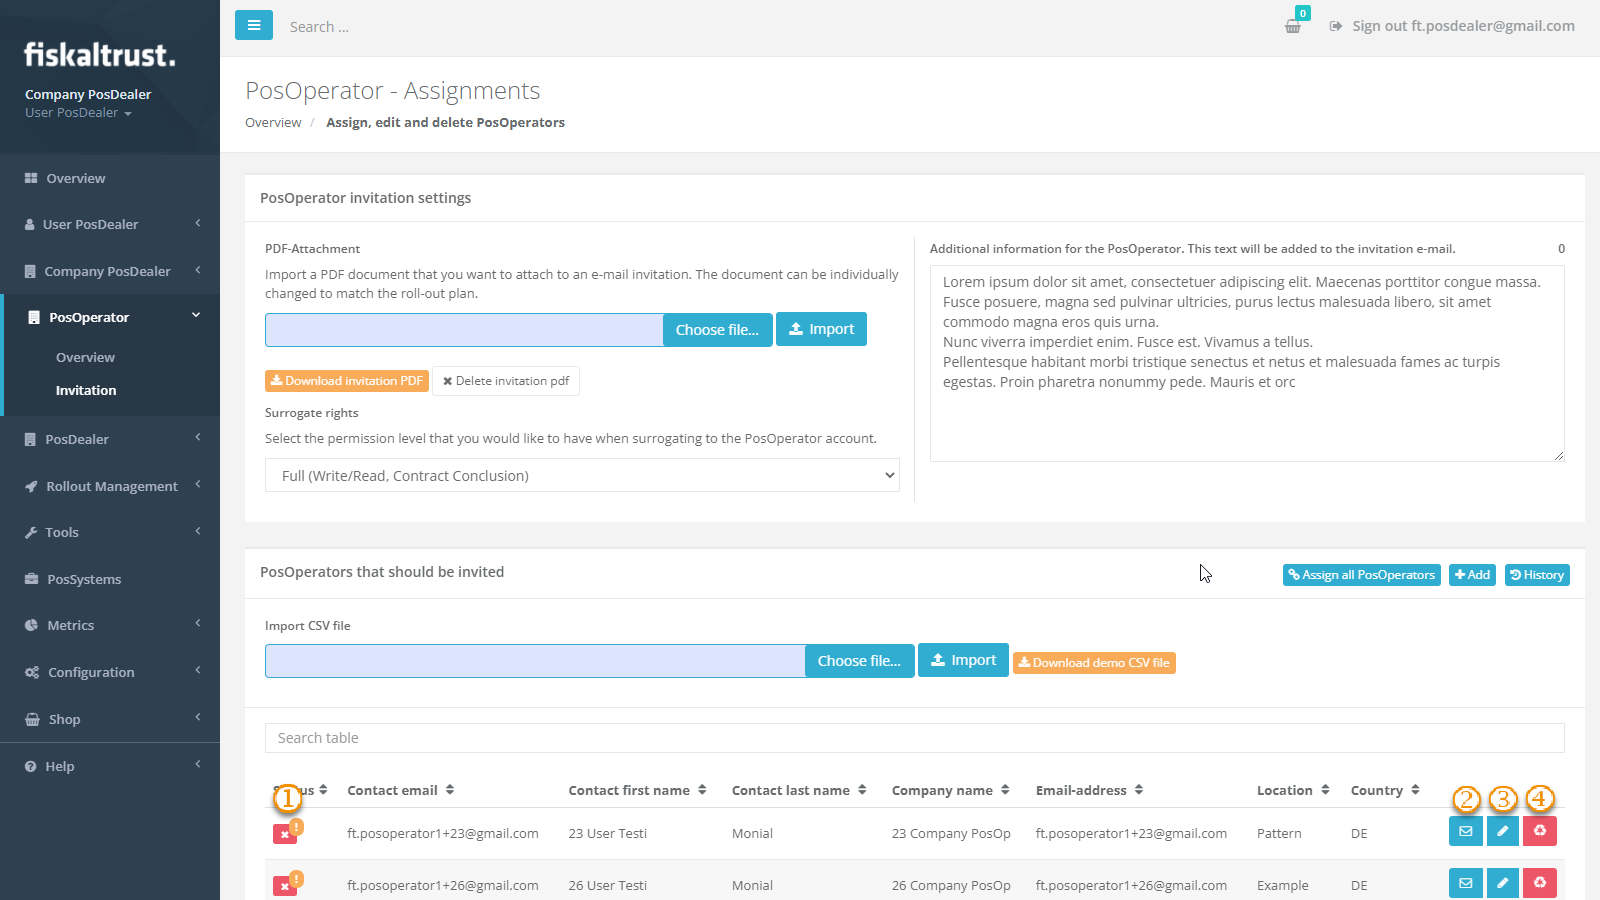
Figure 6. Invitation list with invitation status and row actions.
| Step | Description |
|---|---|
| Check the Status of the invitation: Invitation Sent, Press "Send" to invite PosOperator (not sent yet), or Failed sending (red symbol; hover over it to see the reason). |
| Choose Send Invitation to this PosOperator (envelope icon) to send this single e-mail invitation, or Invite all PosOperators to send all. For an invitation that was already sent, the row shows Resend invitation to this PosOperator instead. |
| If the invitation cannot be assigned to your account because the PosOperator's data is incorrect or incomplete, choose Edit to correct it. |
| Choose Delete to remove the data of a PosOperator who is not yet assigned. |
If This E-Mail address already exists appears, see Onboarding of existing PosOperators. |
Table 5. Checking the invitation status and handling error messages.
Inviting PosOperators in a bulk process
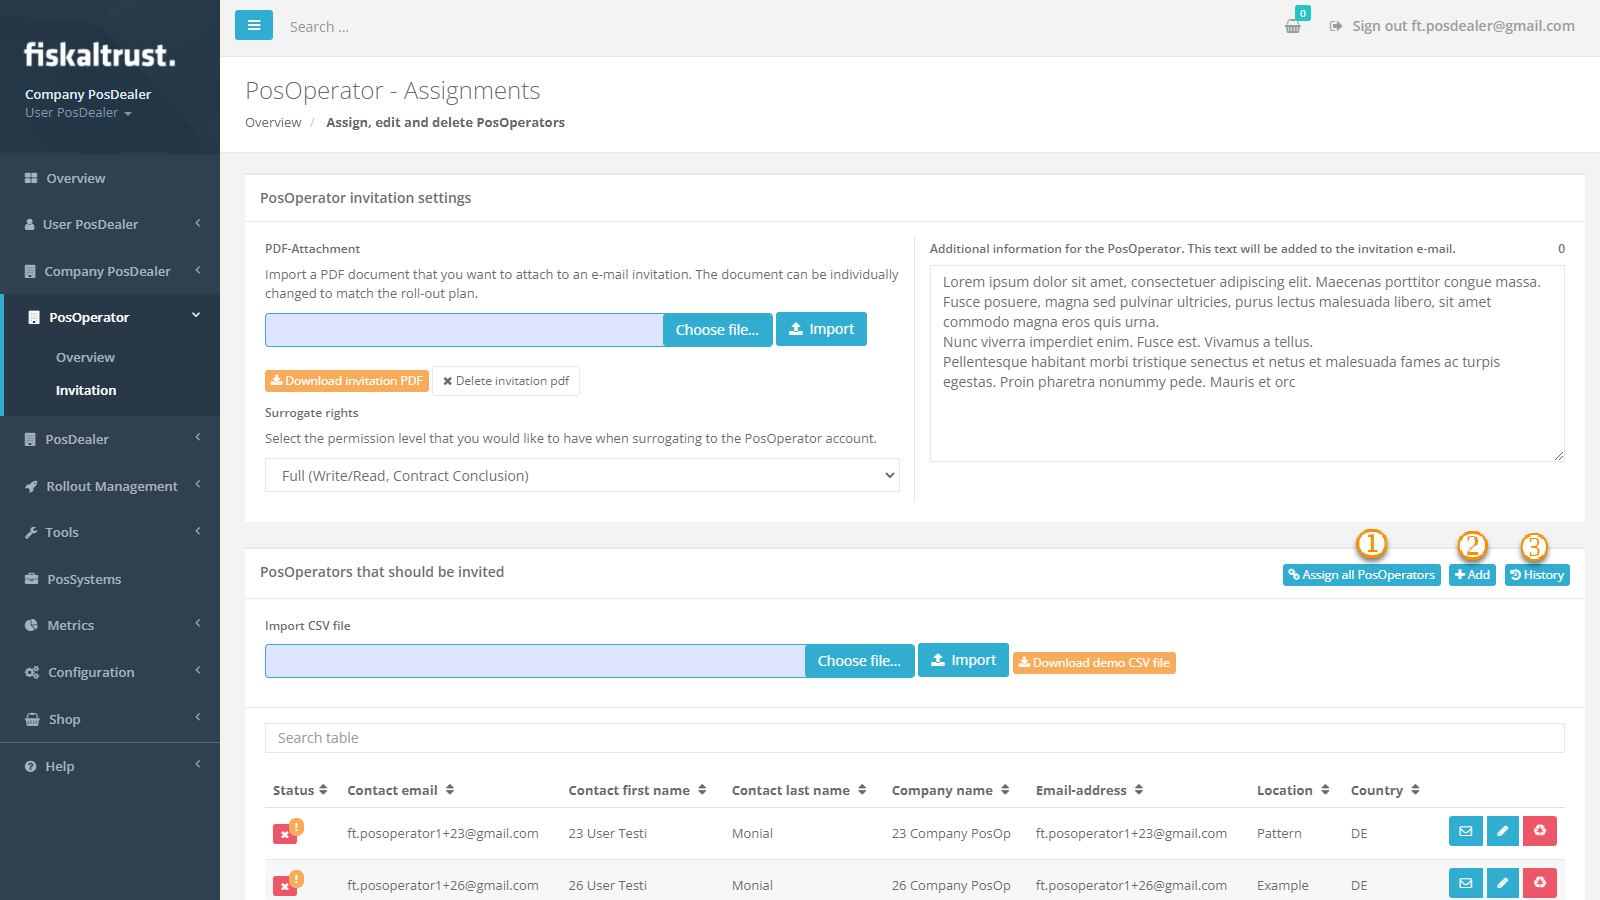
Figure 7. Buttons for inviting PosOperators in a bulk process.
| Button | Description |
|---|---|
| Invite all PosOperators: sends the e-mail invitation to all PosOperators in the list who have not yet been invited. |
| +Add: adds a single PosOperator manually. For more information, see Invitation of a single PosOperator. |
| History: opens the invitation history to check or repair e-mail invitations (see Options with invited PosOperators). |
Table 6. Buttons for inviting PosOperators in a bulk process.
Onboarding of existing PosOperators
If the message This E-Mail address already exists appears, another PosDealer has already onboarded the PosOperator. In this case, the PosOperator requests the assignment to your account.
Do not, under any circumstances, invite this PosOperator again using a different e-mail address. This causes problems when verifying the business identifications used to authenticate with tax authorities or third-party services.
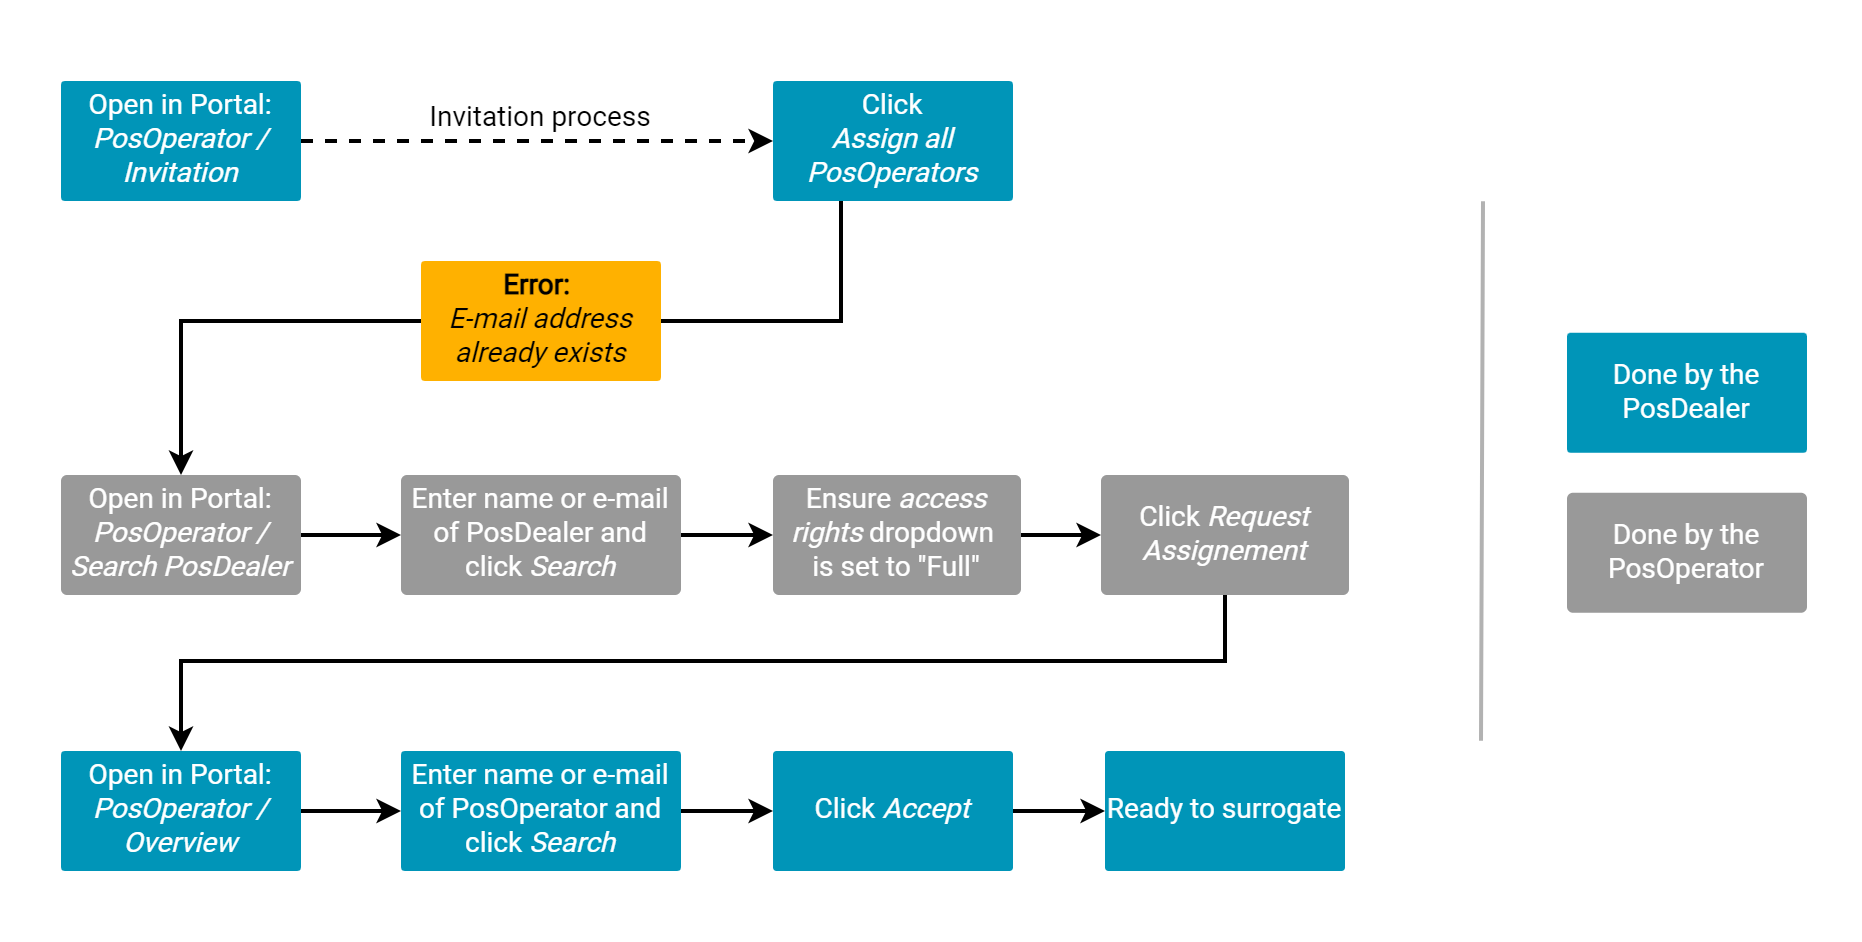
Figure 8. Onboarding a PosOperator who already has an account.
| Step | Description |
|---|---|
| You choose Invite all PosOperators (PosDealer > Invitation) and get the message This E-Mail address already exists. |
| Do not invite this PosOperator again with a different e-mail address. |
| Ask the PosOperator to add your account as a new or further PosDealer. |
| The PosOperator opens the fiskaltrust.Portal and chooses PosOperator > Search dealer/consultant. |
| The PosOperator searches for your account, for example by name or e-mail address. |
| After checking name, e-mail address and access rights, the PosOperator chooses Request assignment – dealer. |
| You choose PosDealer > PosOperators, find the new PosOperator and choose Accept. The PosOperator's name becomes an active link that you can use for surrogating. |
Table 7. Steps to onboard a PosOperator who already has an account.
Options with invited PosOperators
Choose PosDealer > Invitation > History to open the invitation history.
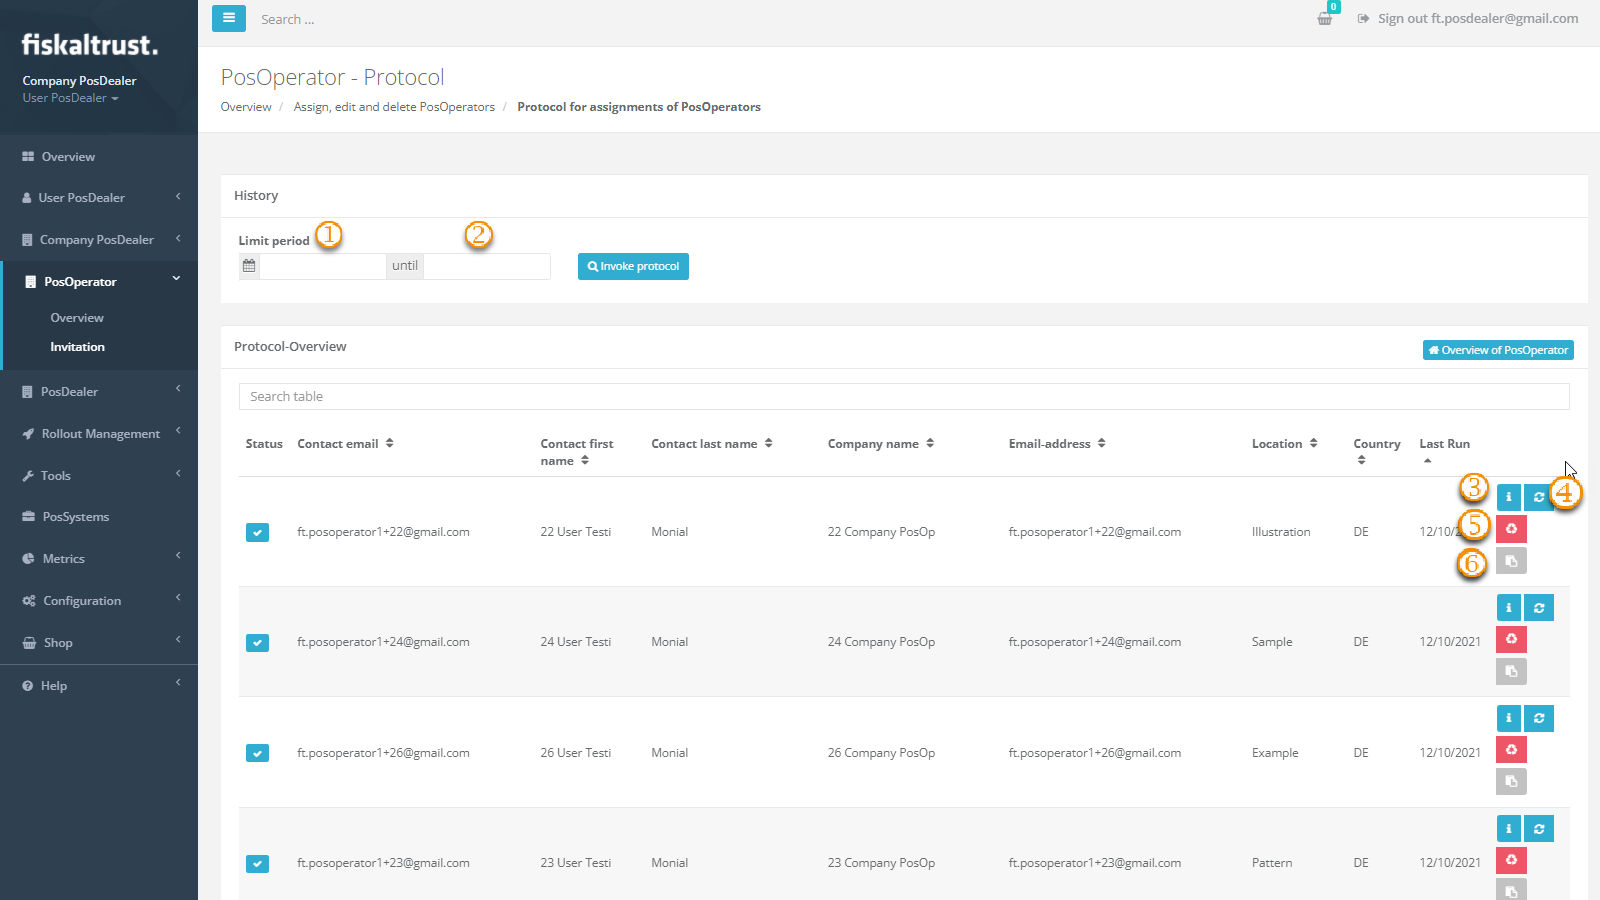
Figure 9. Invitation history.
| Option | Description |
|---|---|
| Start date: restricts the history to invitations from this date. |
| End date (after until): restricts the history to invitations up to this date. Without dates, the whole history is shown. To narrow down the list further, enter text in the search field (Search...); clear the field to see all entries again. |
| Details: shows the data of the invitation. |
| Send invitation again: resends the e-mail invitation for this record. |
| Delete the record. You cannot delete an e-mail address entirely in the fiskaltrust.Portal, so you cannot transfer an e-mail address that was used once to any other account. |
| Copy link to Clipboard: shows the direct invitation link. Copy it and send it to your PosOperator by direct message. |
Table 8. Options in the invitation history.
To return to the invitation page, choose Overview of PosOperator.